> ## Documentation Index
> Fetch the complete documentation index at: https://help.lunacal.ai/llms.txt
> Use this file to discover all available pages before exploring further.
# Setup Your Availability
> You can set up your regular availability for bookings, add exceptions for times when you’re not available, and customize availability for specific event types from the event settings.
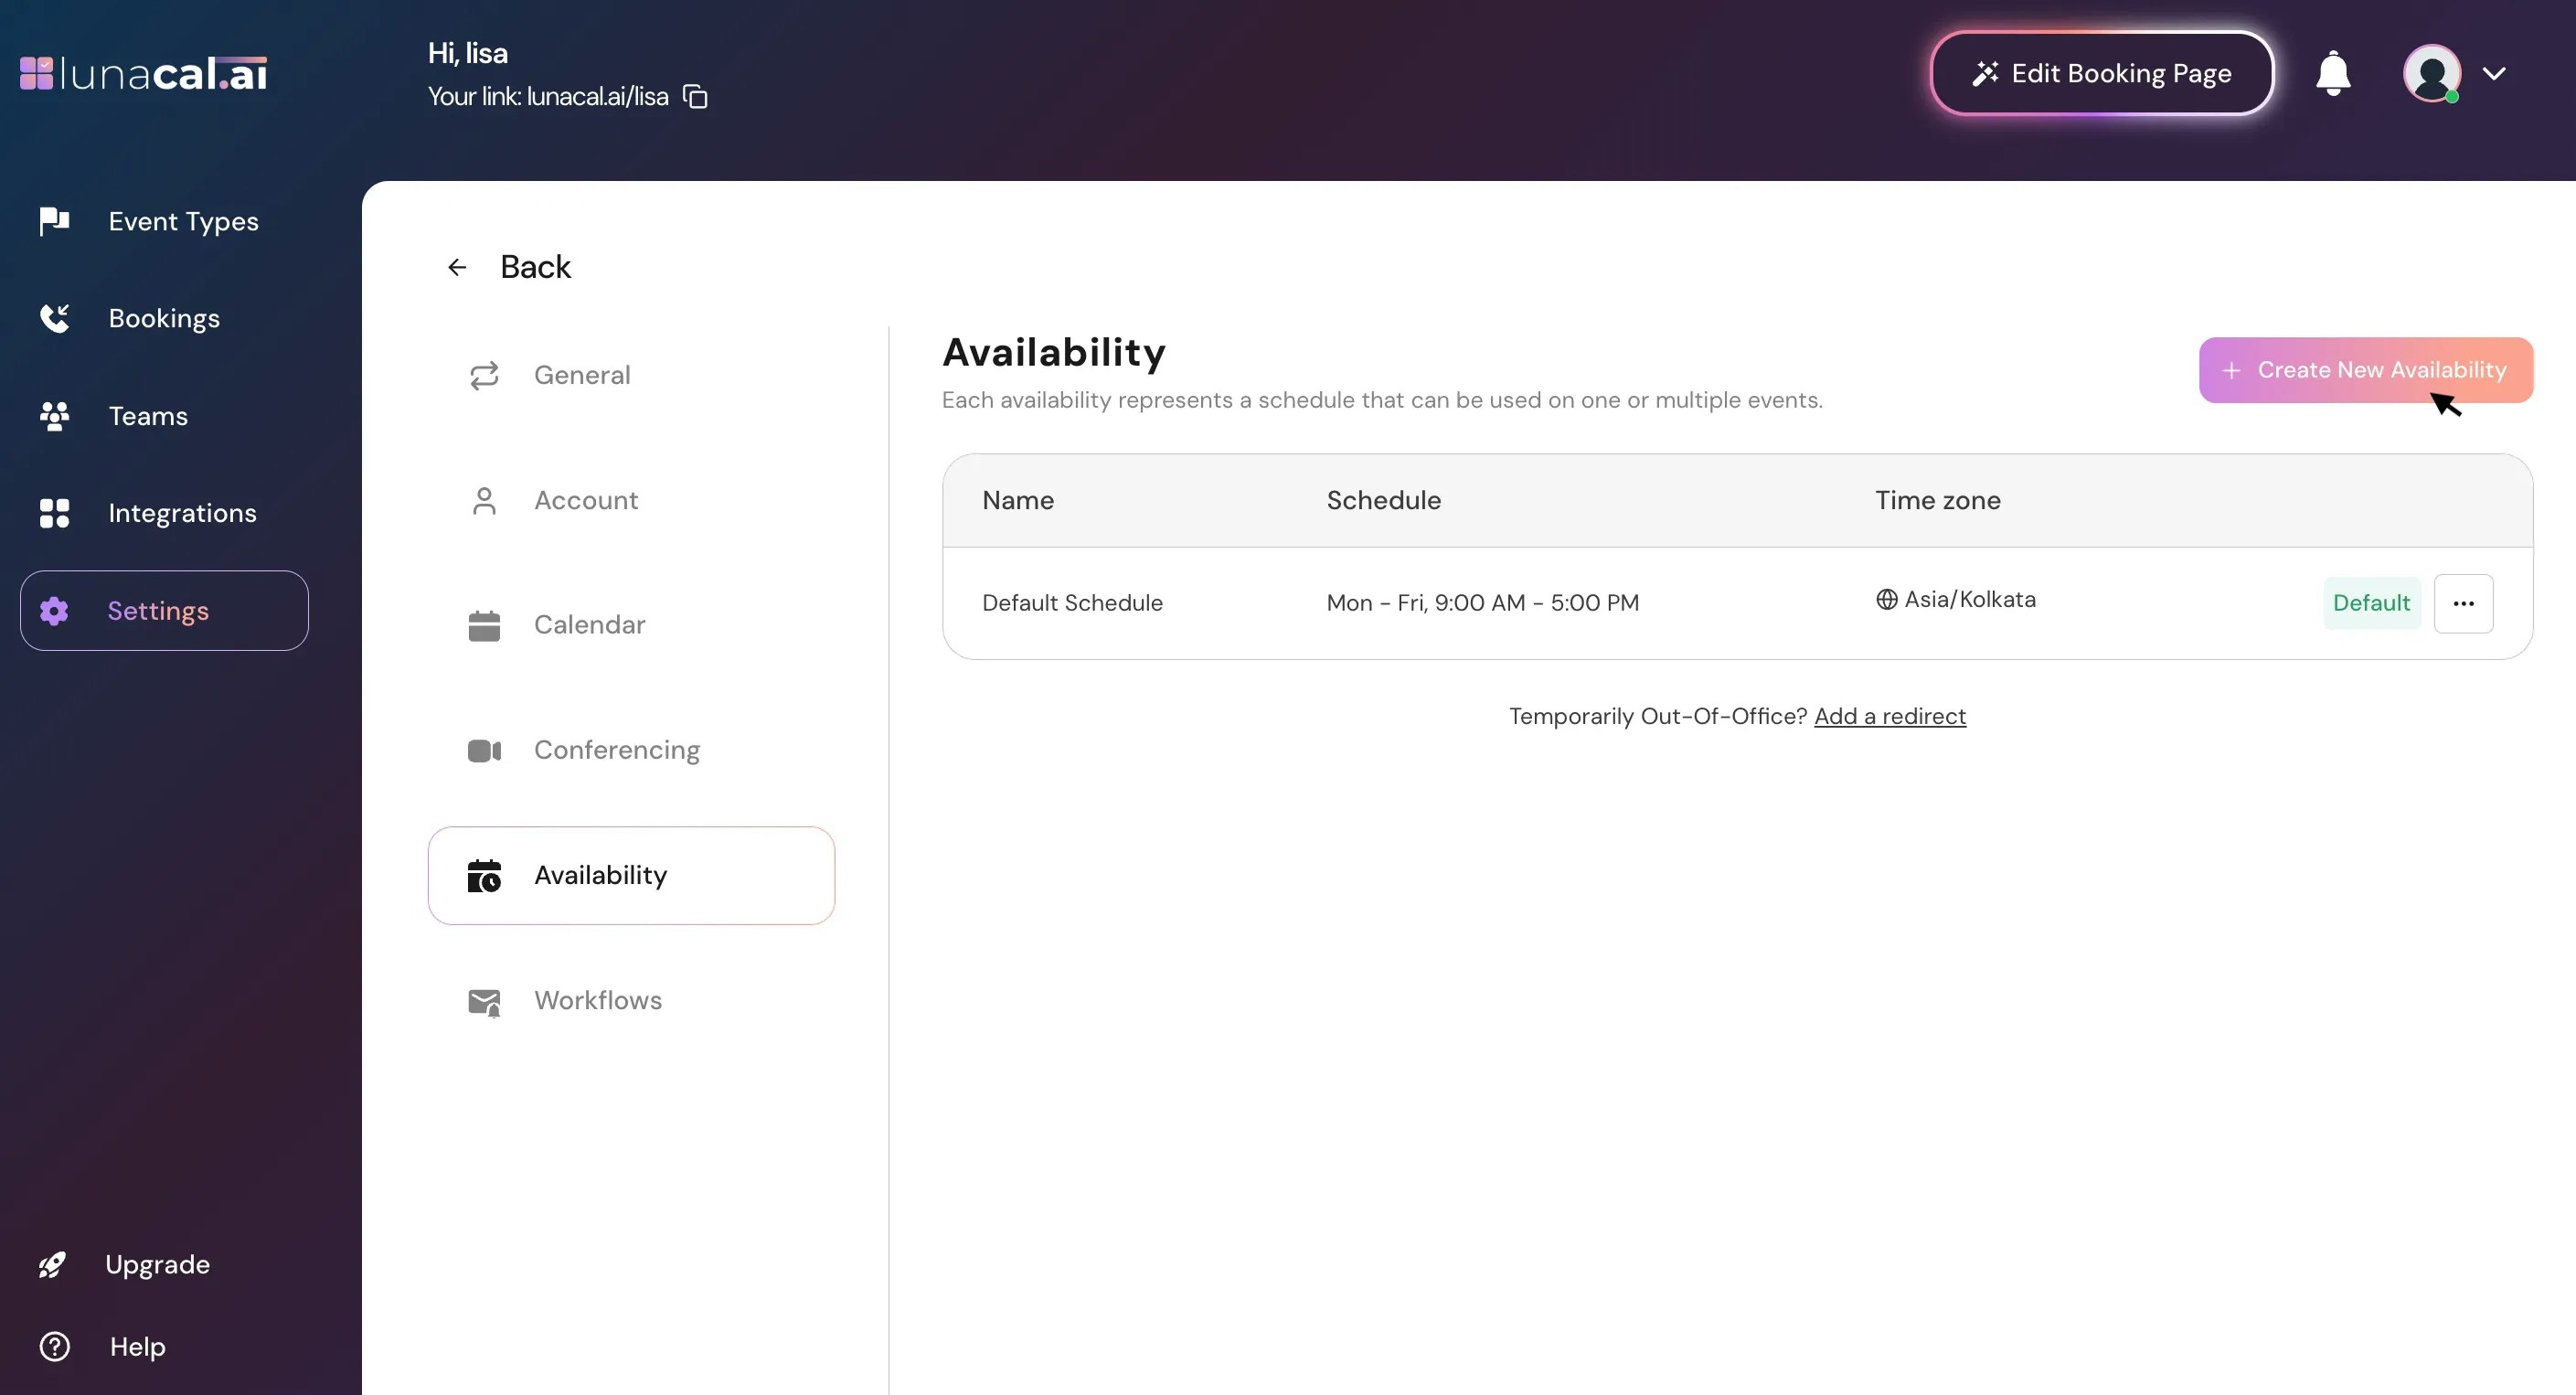
## Step 1
To create a new availability, go to [**Availability**](https://app.lunacal.ai/new-settings?tabName=availability).
 ## Step 2
You’ll see a default schedule. Click “**Create New Availability**”.
## Step 2
You’ll see a default schedule. Click “**Create New Availability**”.
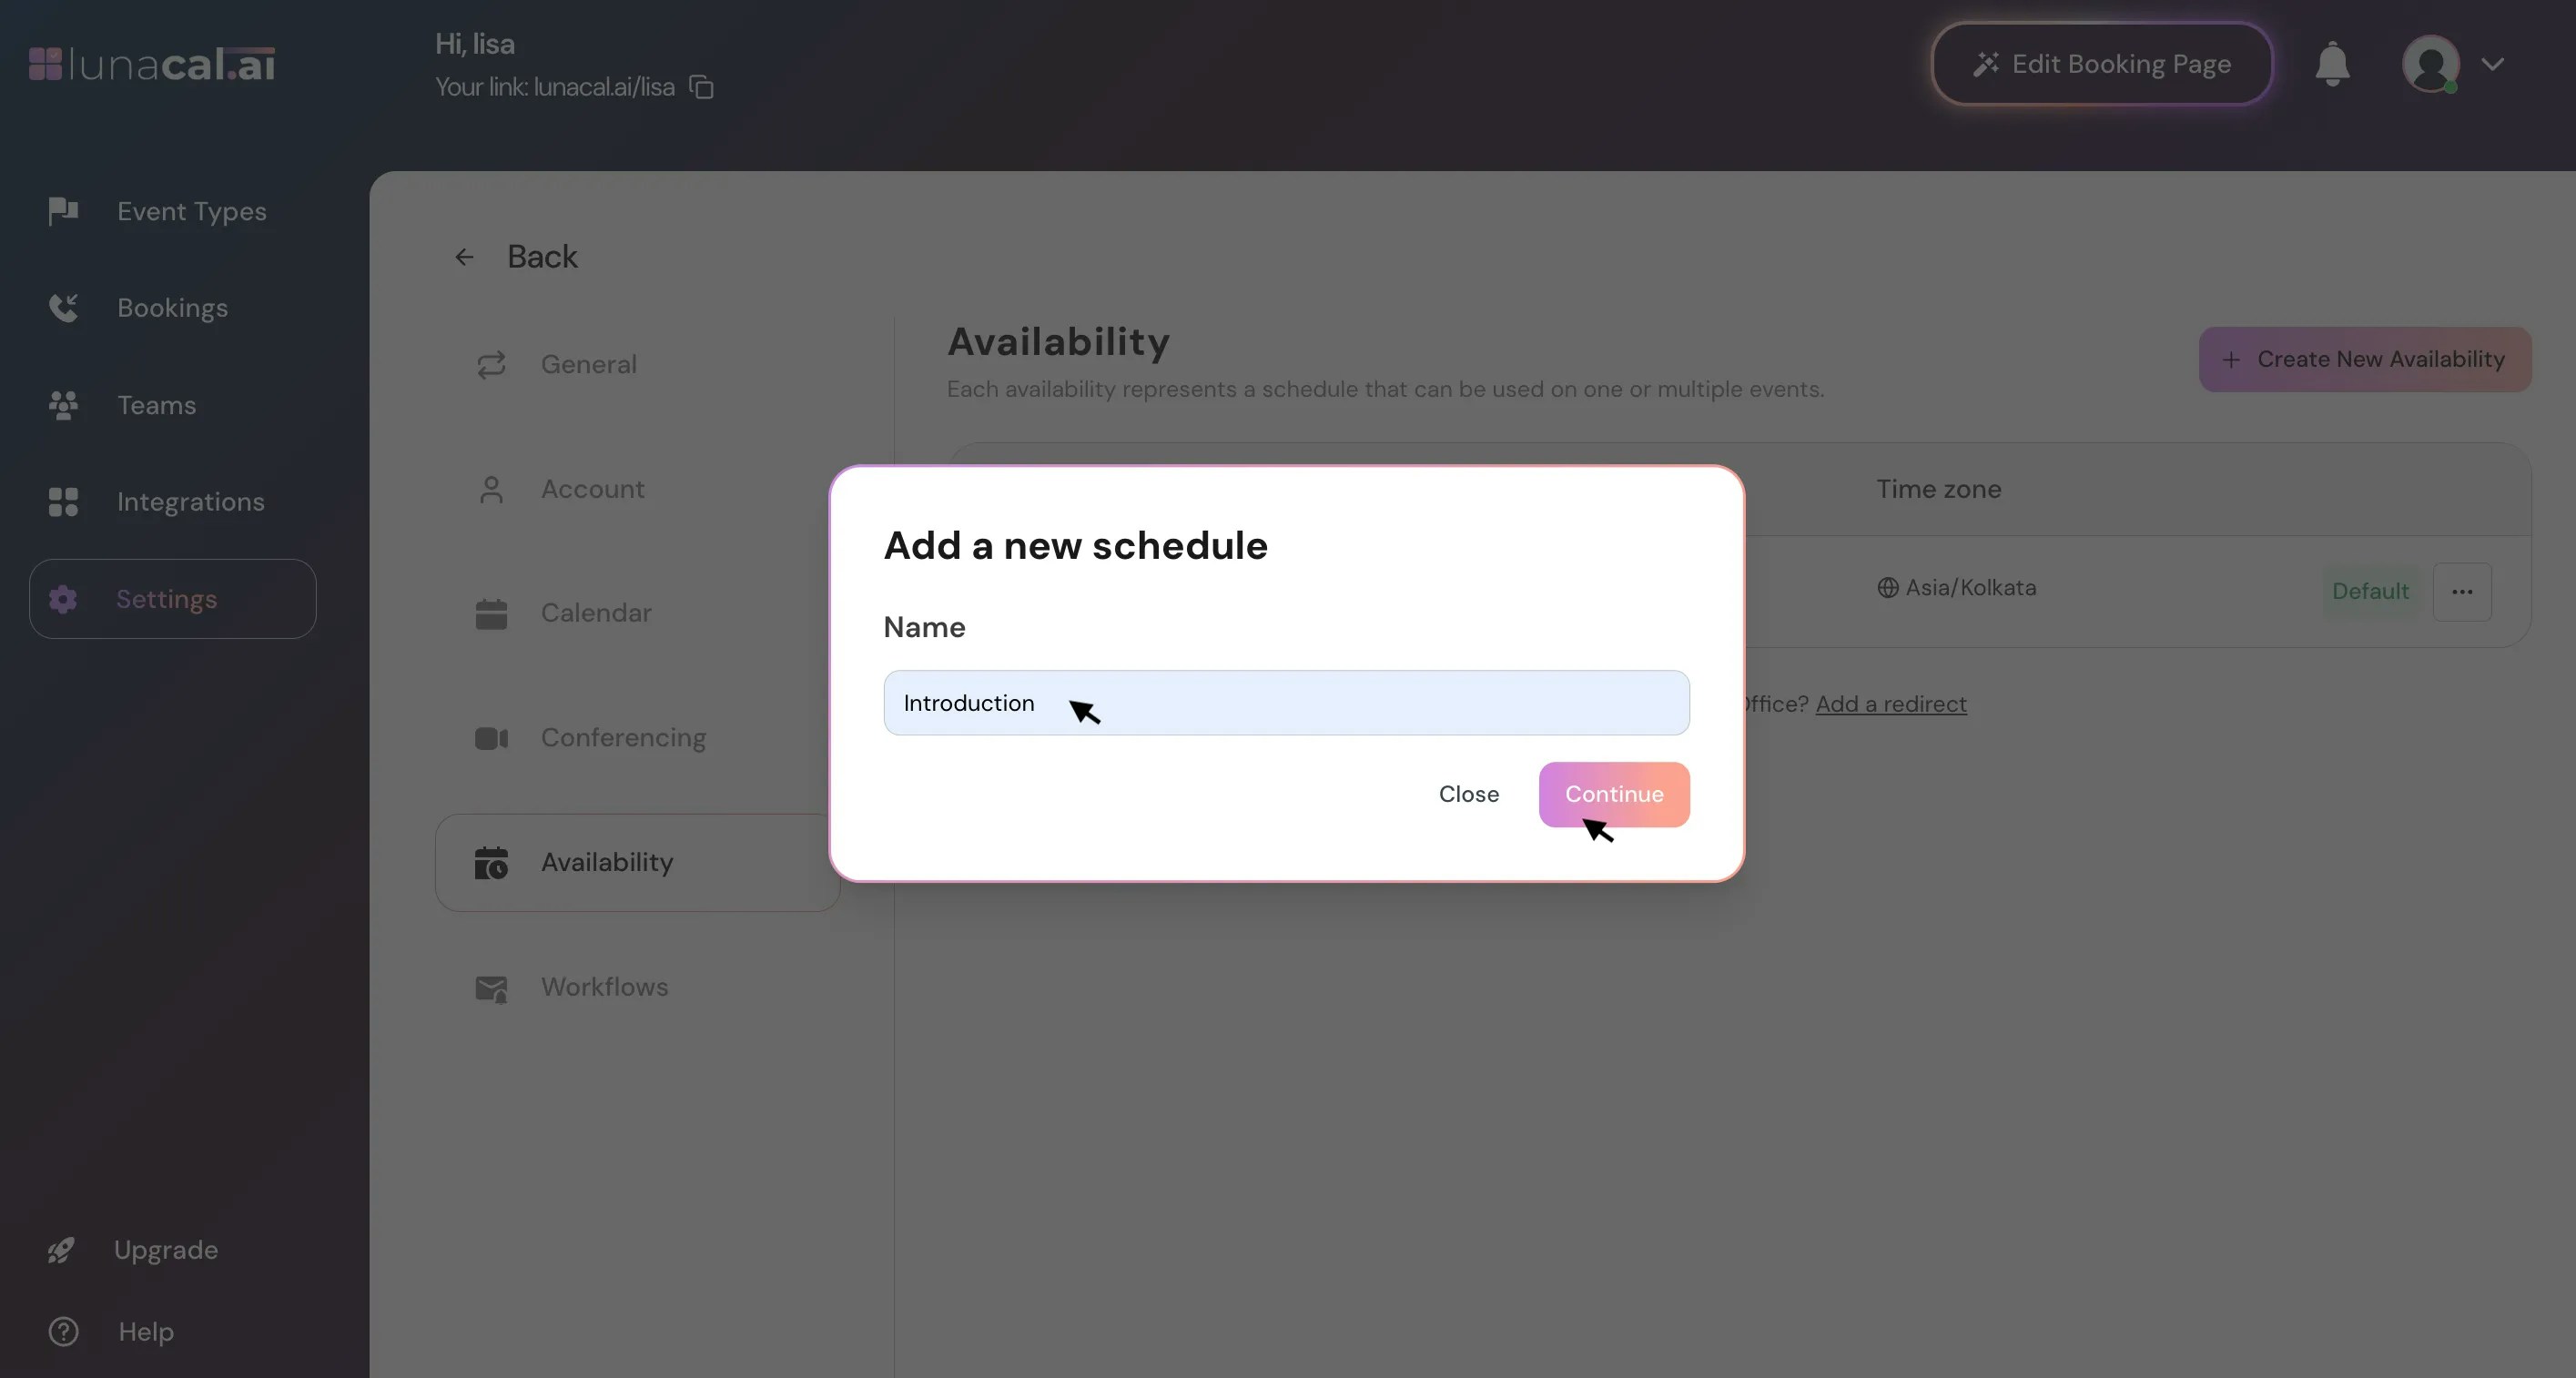
 ## Step 3
Enter a name (for example, “**Introduction**”) and click “**Continue**”.
## Step 3
Enter a name (for example, “**Introduction**”) and click “**Continue**”.
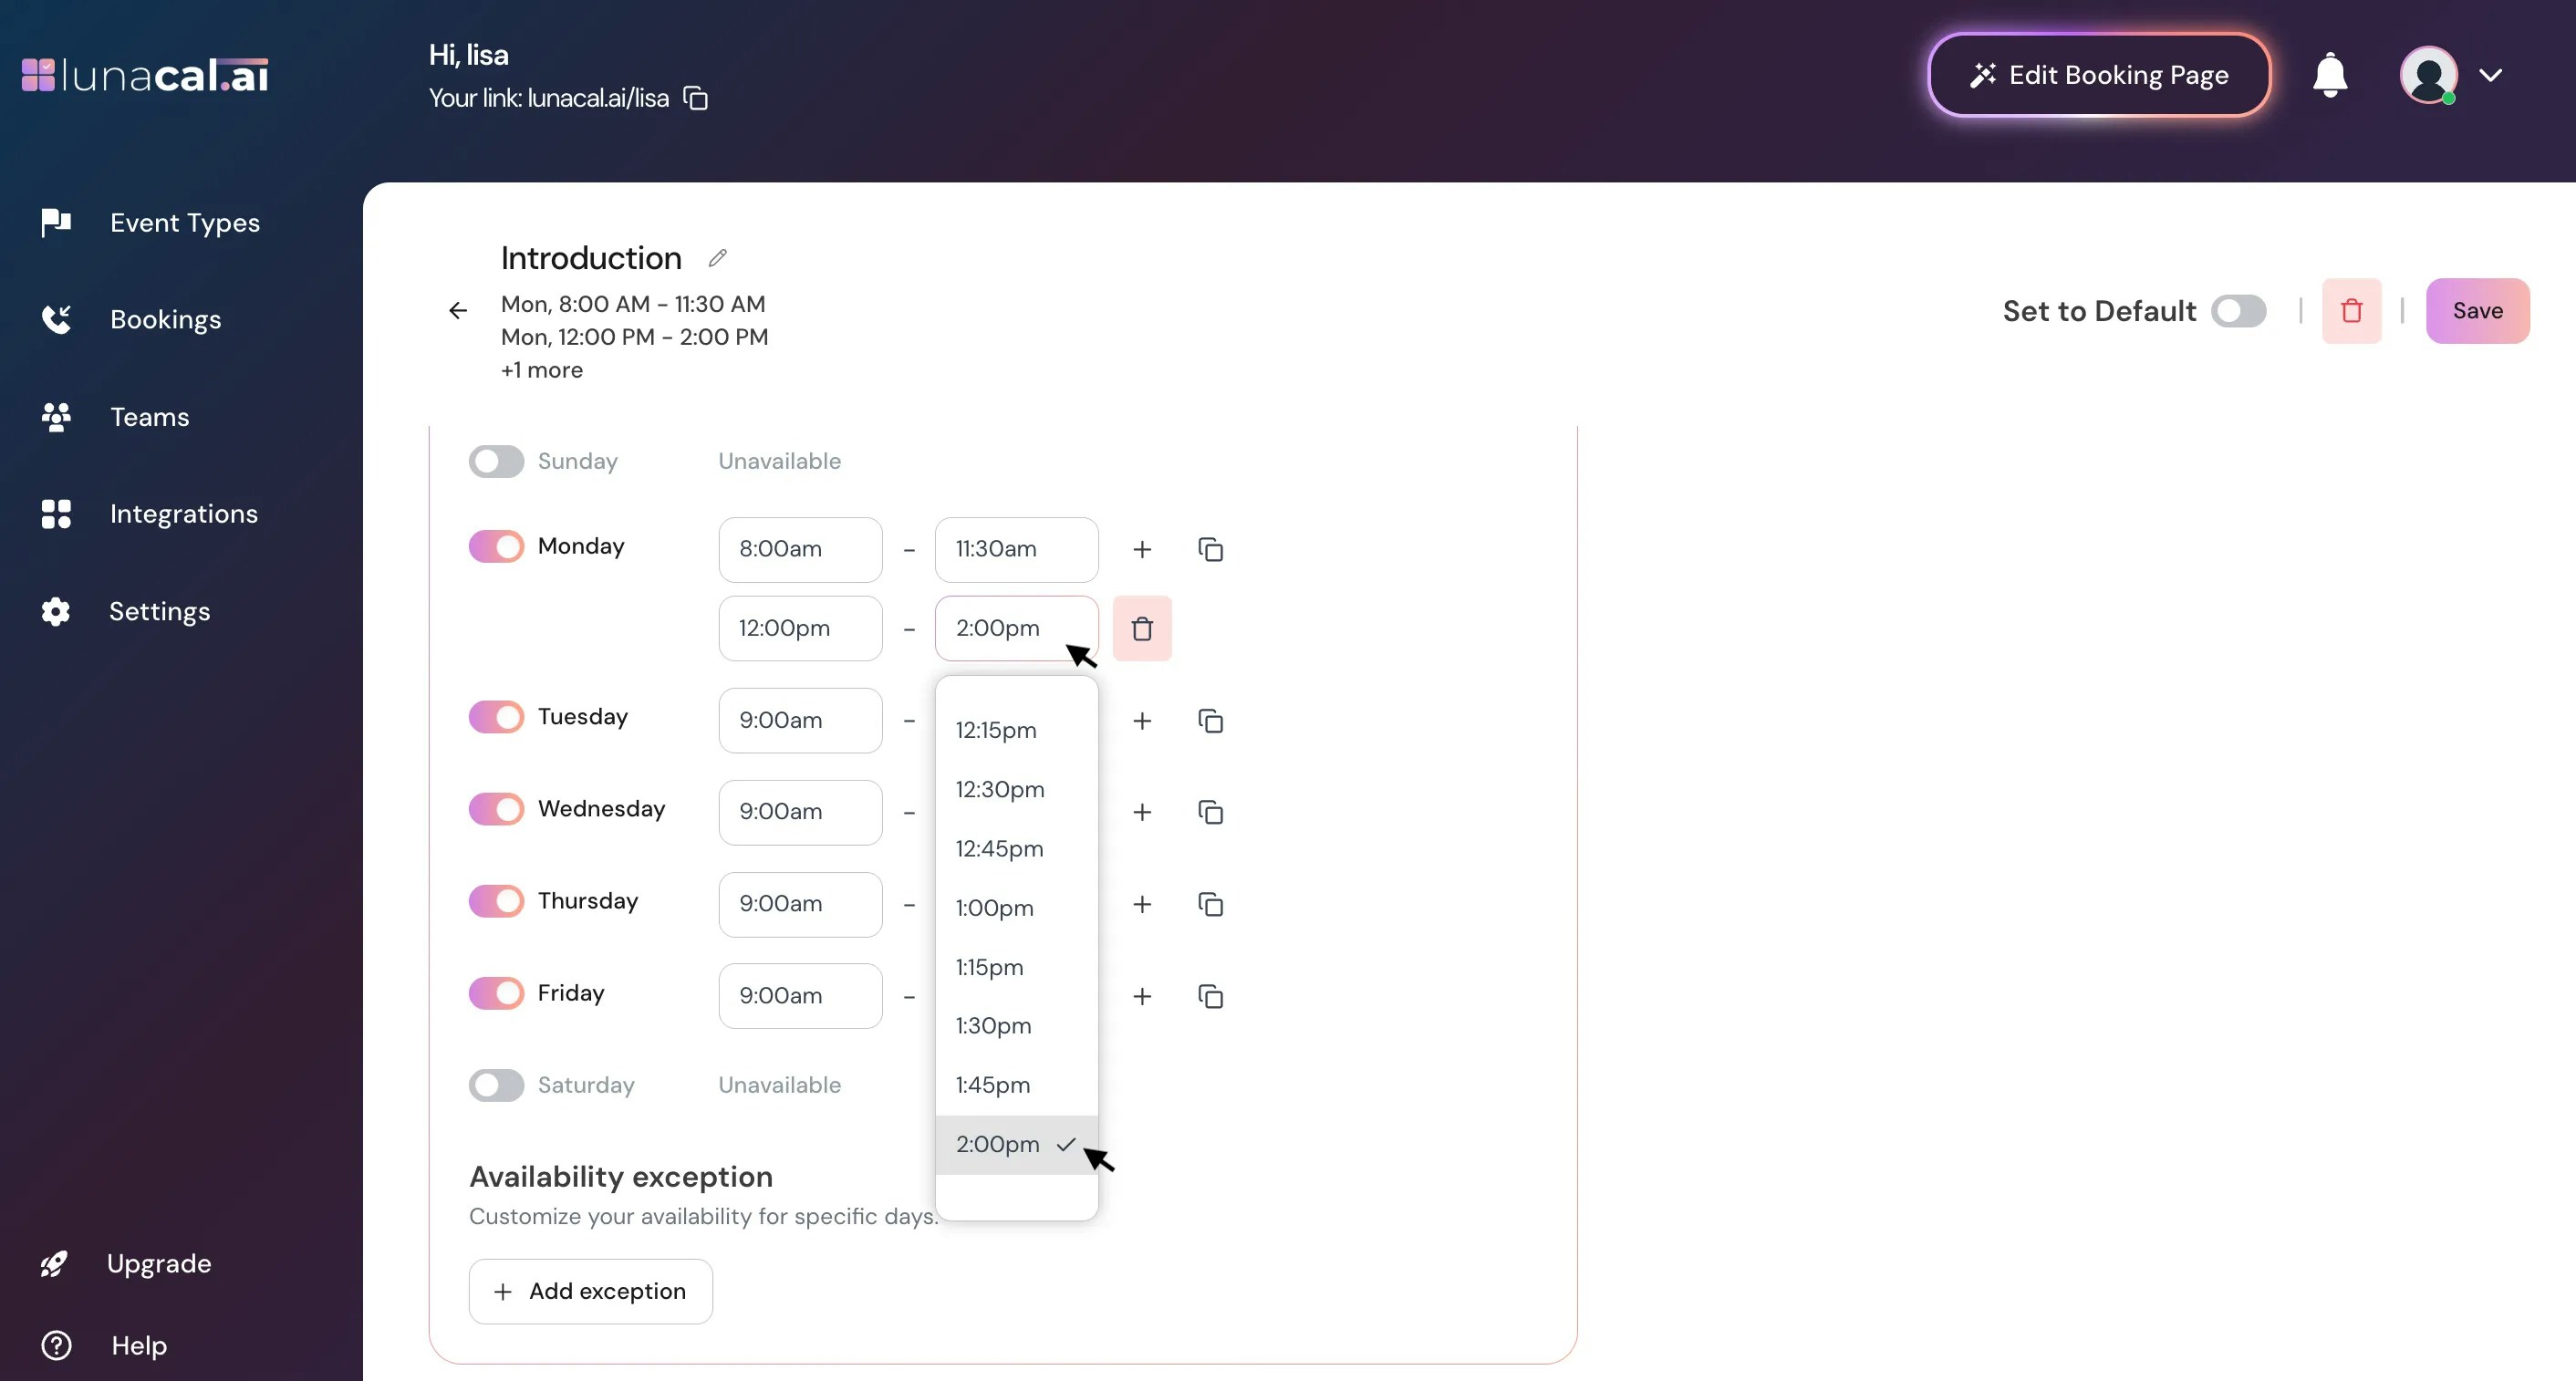
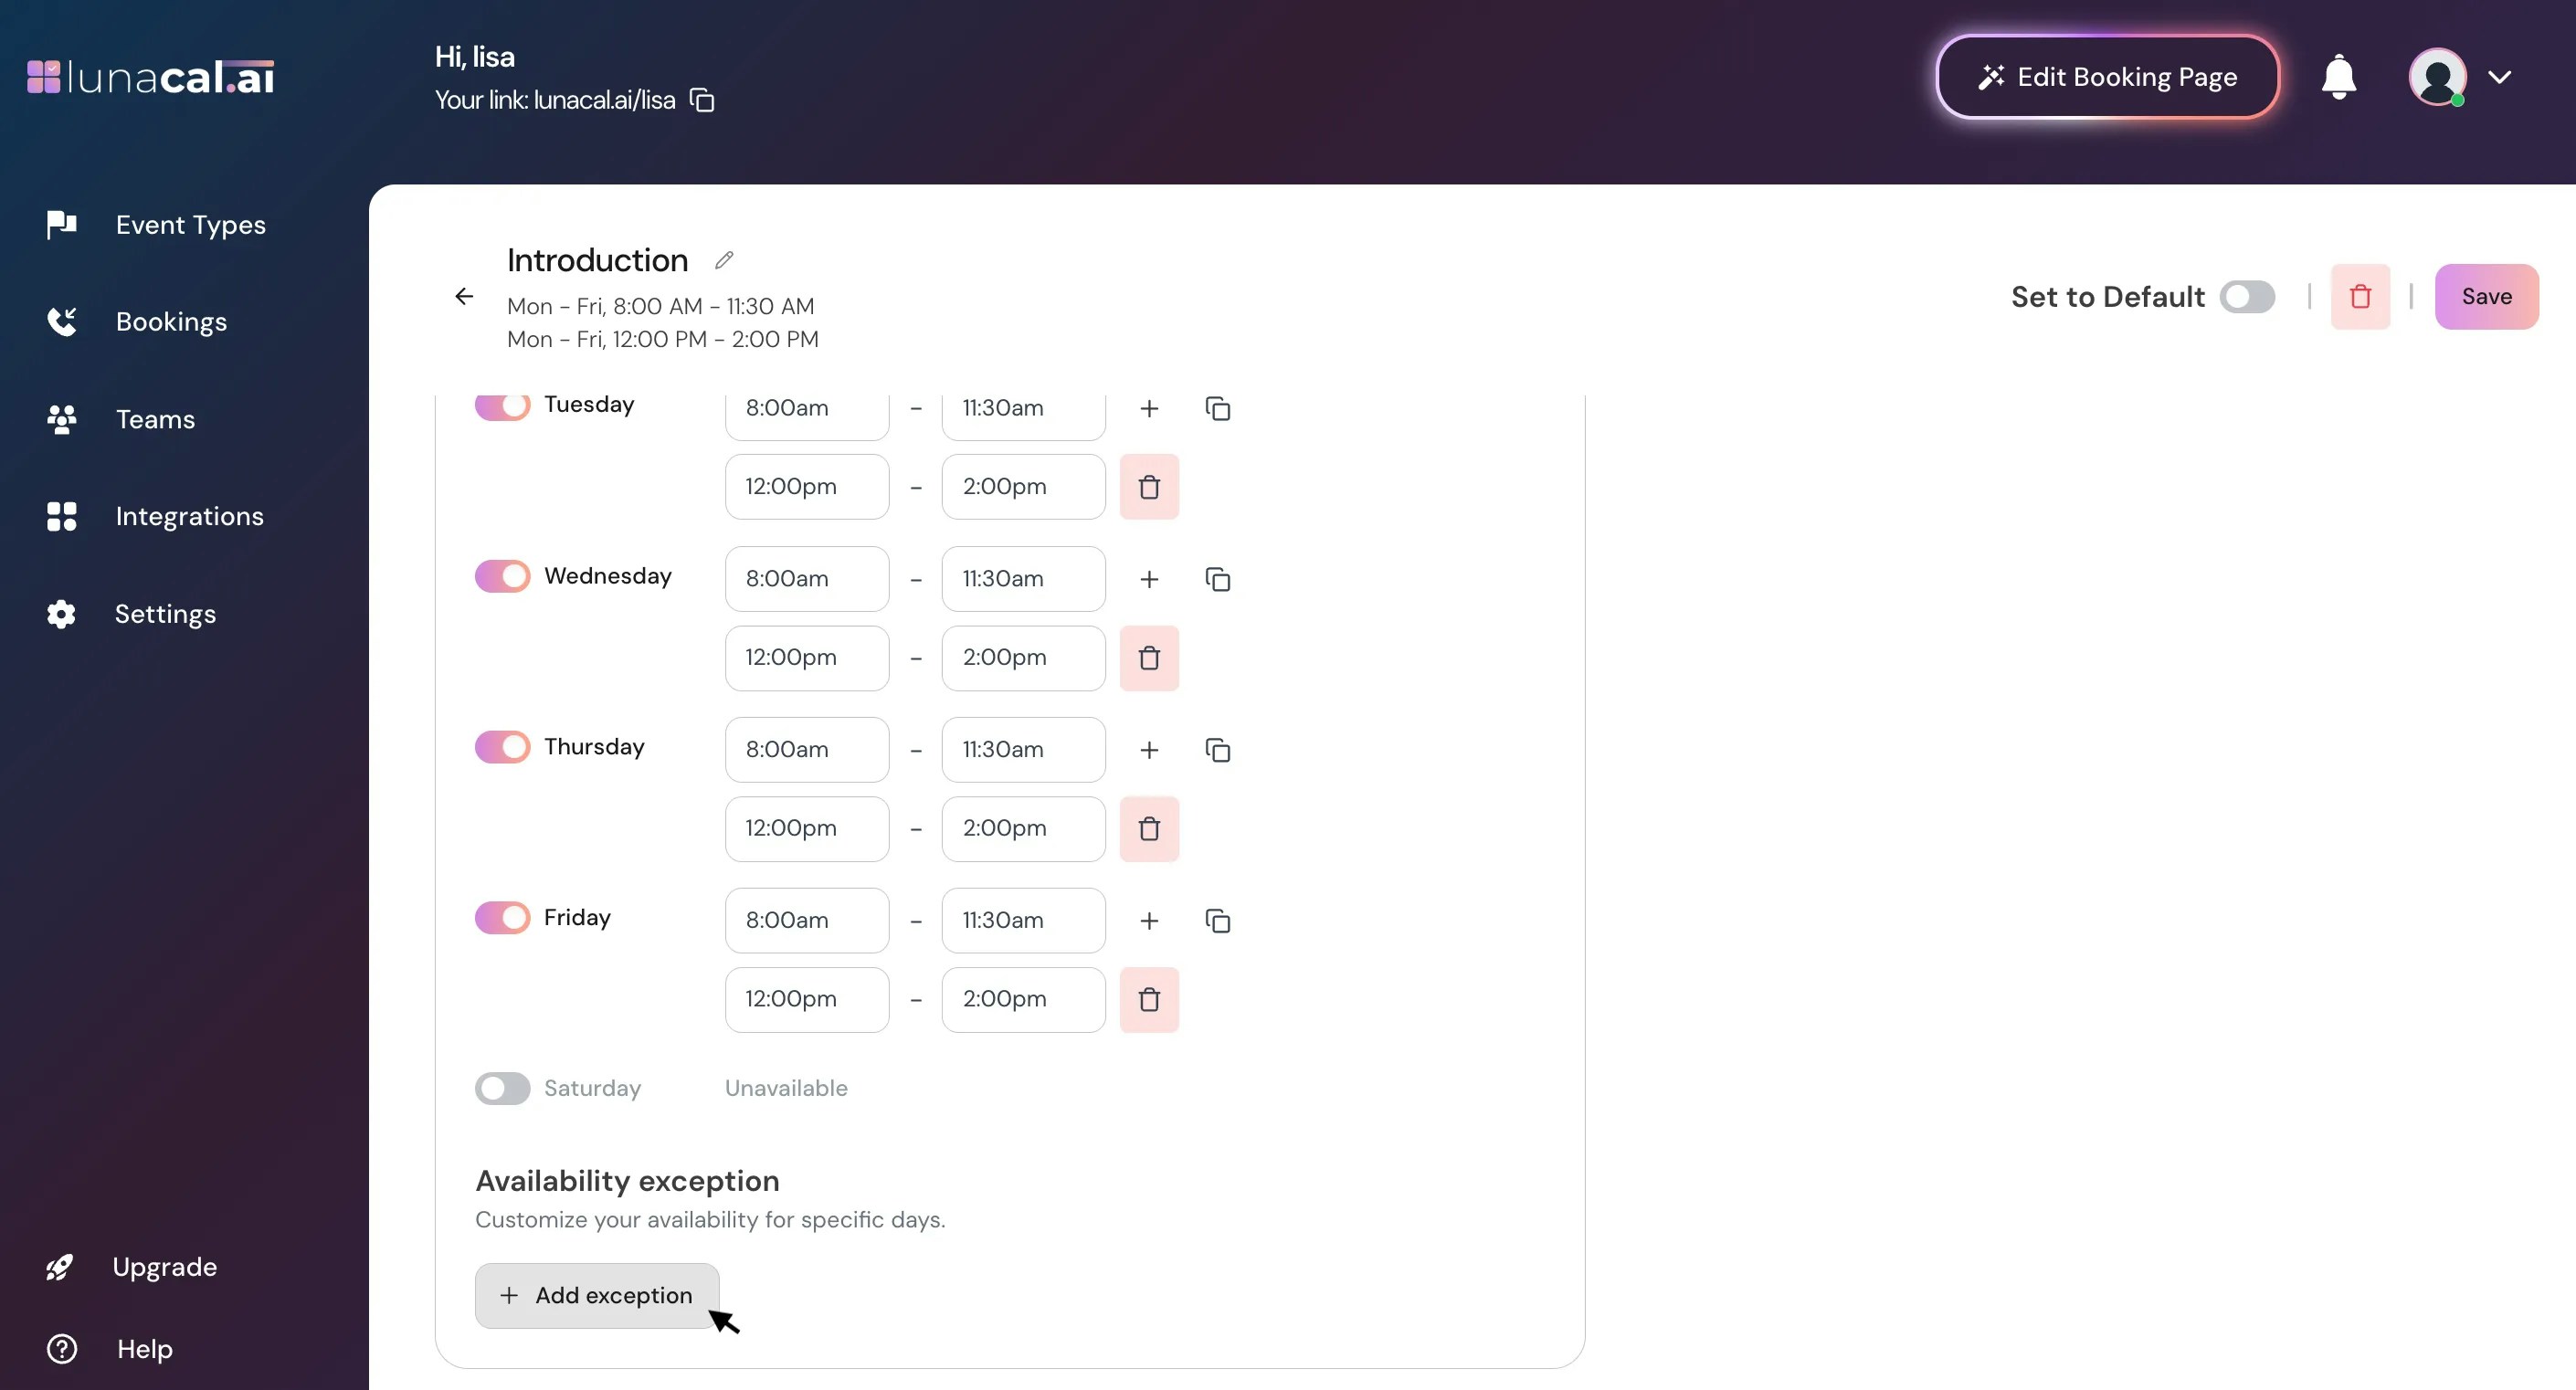
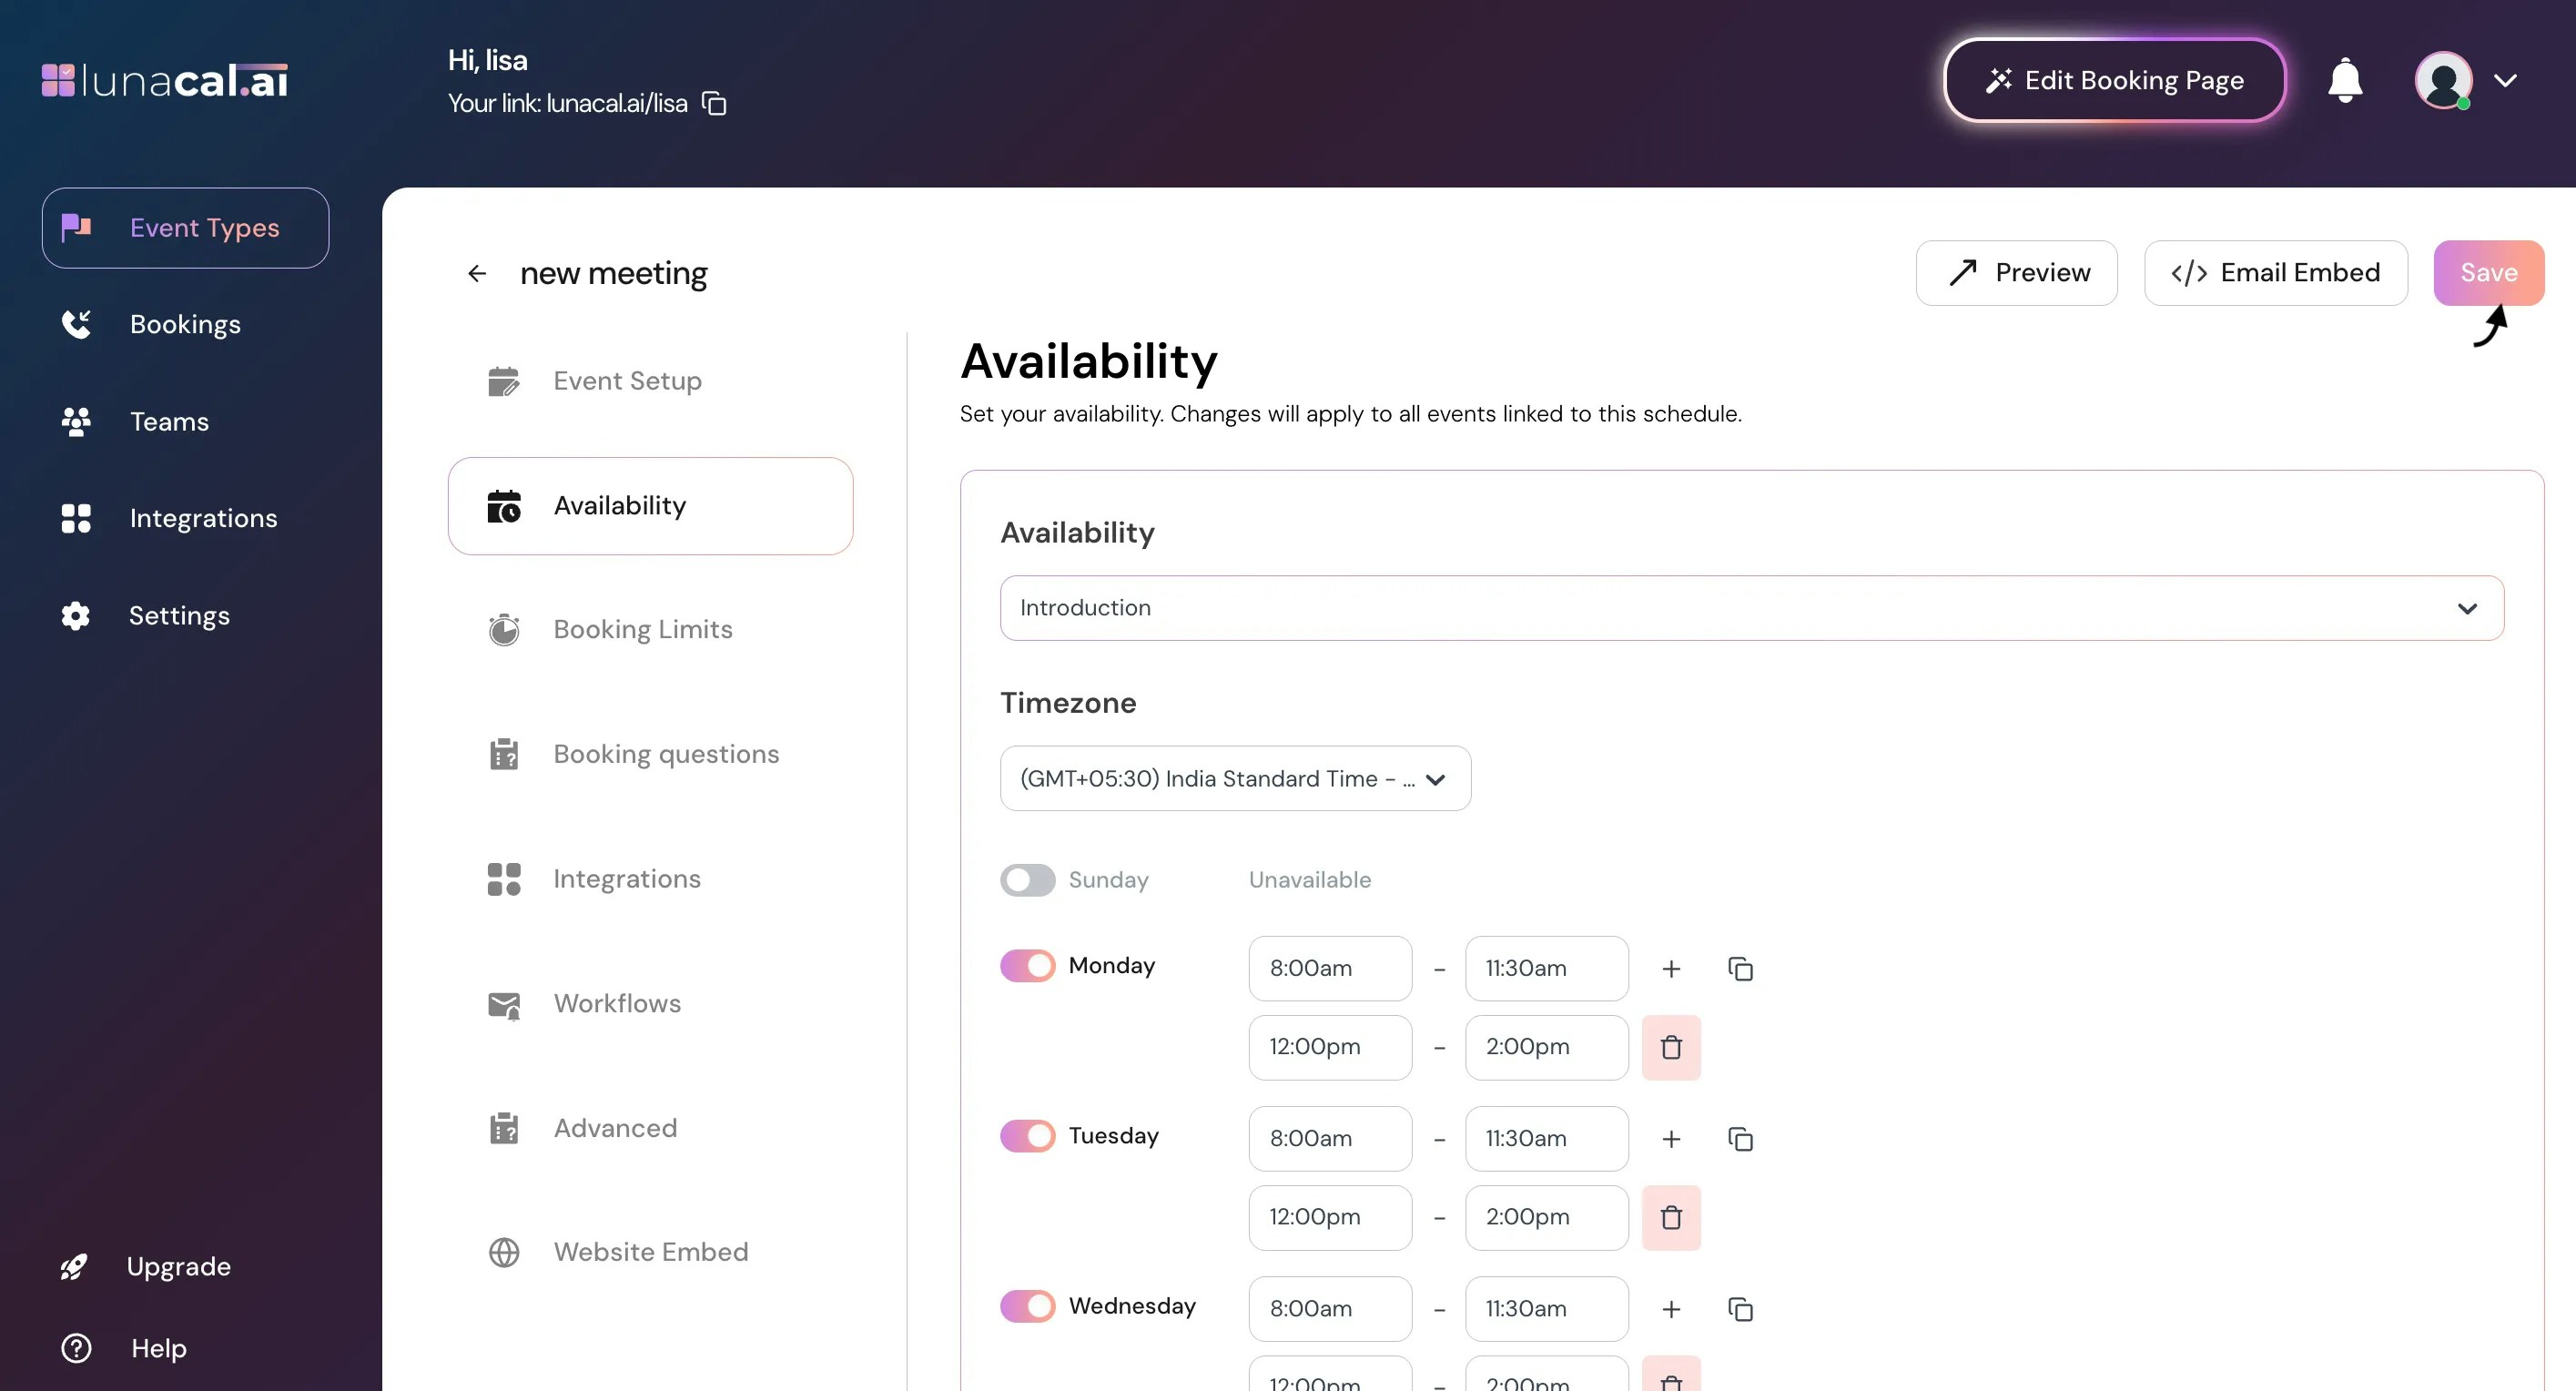
 ## Step 4
Adjust your default working hours (for example, **9:00 AM–5:00 PM**) and turn specific days on or off.\
Any day you disable won’t appear on your booking page.\
**Example:** If you work **Monday** to **Thursday**, disable Friday to Sunday so no one can book on those days.
## Step 4
Adjust your default working hours (for example, **9:00 AM–5:00 PM**) and turn specific days on or off.\
Any day you disable won’t appear on your booking page.\
**Example:** If you work **Monday** to **Thursday**, disable Friday to Sunday so no one can book on those days.
 ## Step 5
If you work in multiple shifts, click the **plus (+)** icon to add separate time slots.\
For example, if your schedule is **8:00 AM–11:30 AM** and **12:00 PM–2:00 PM**, add both time slots to define your availability clearly. Attendees will then be able to book during those time slots only.
## Step 5
If you work in multiple shifts, click the **plus (+)** icon to add separate time slots.\
For example, if your schedule is **8:00 AM–11:30 AM** and **12:00 PM–2:00 PM**, add both time slots to define your availability clearly. Attendees will then be able to book during those time slots only.
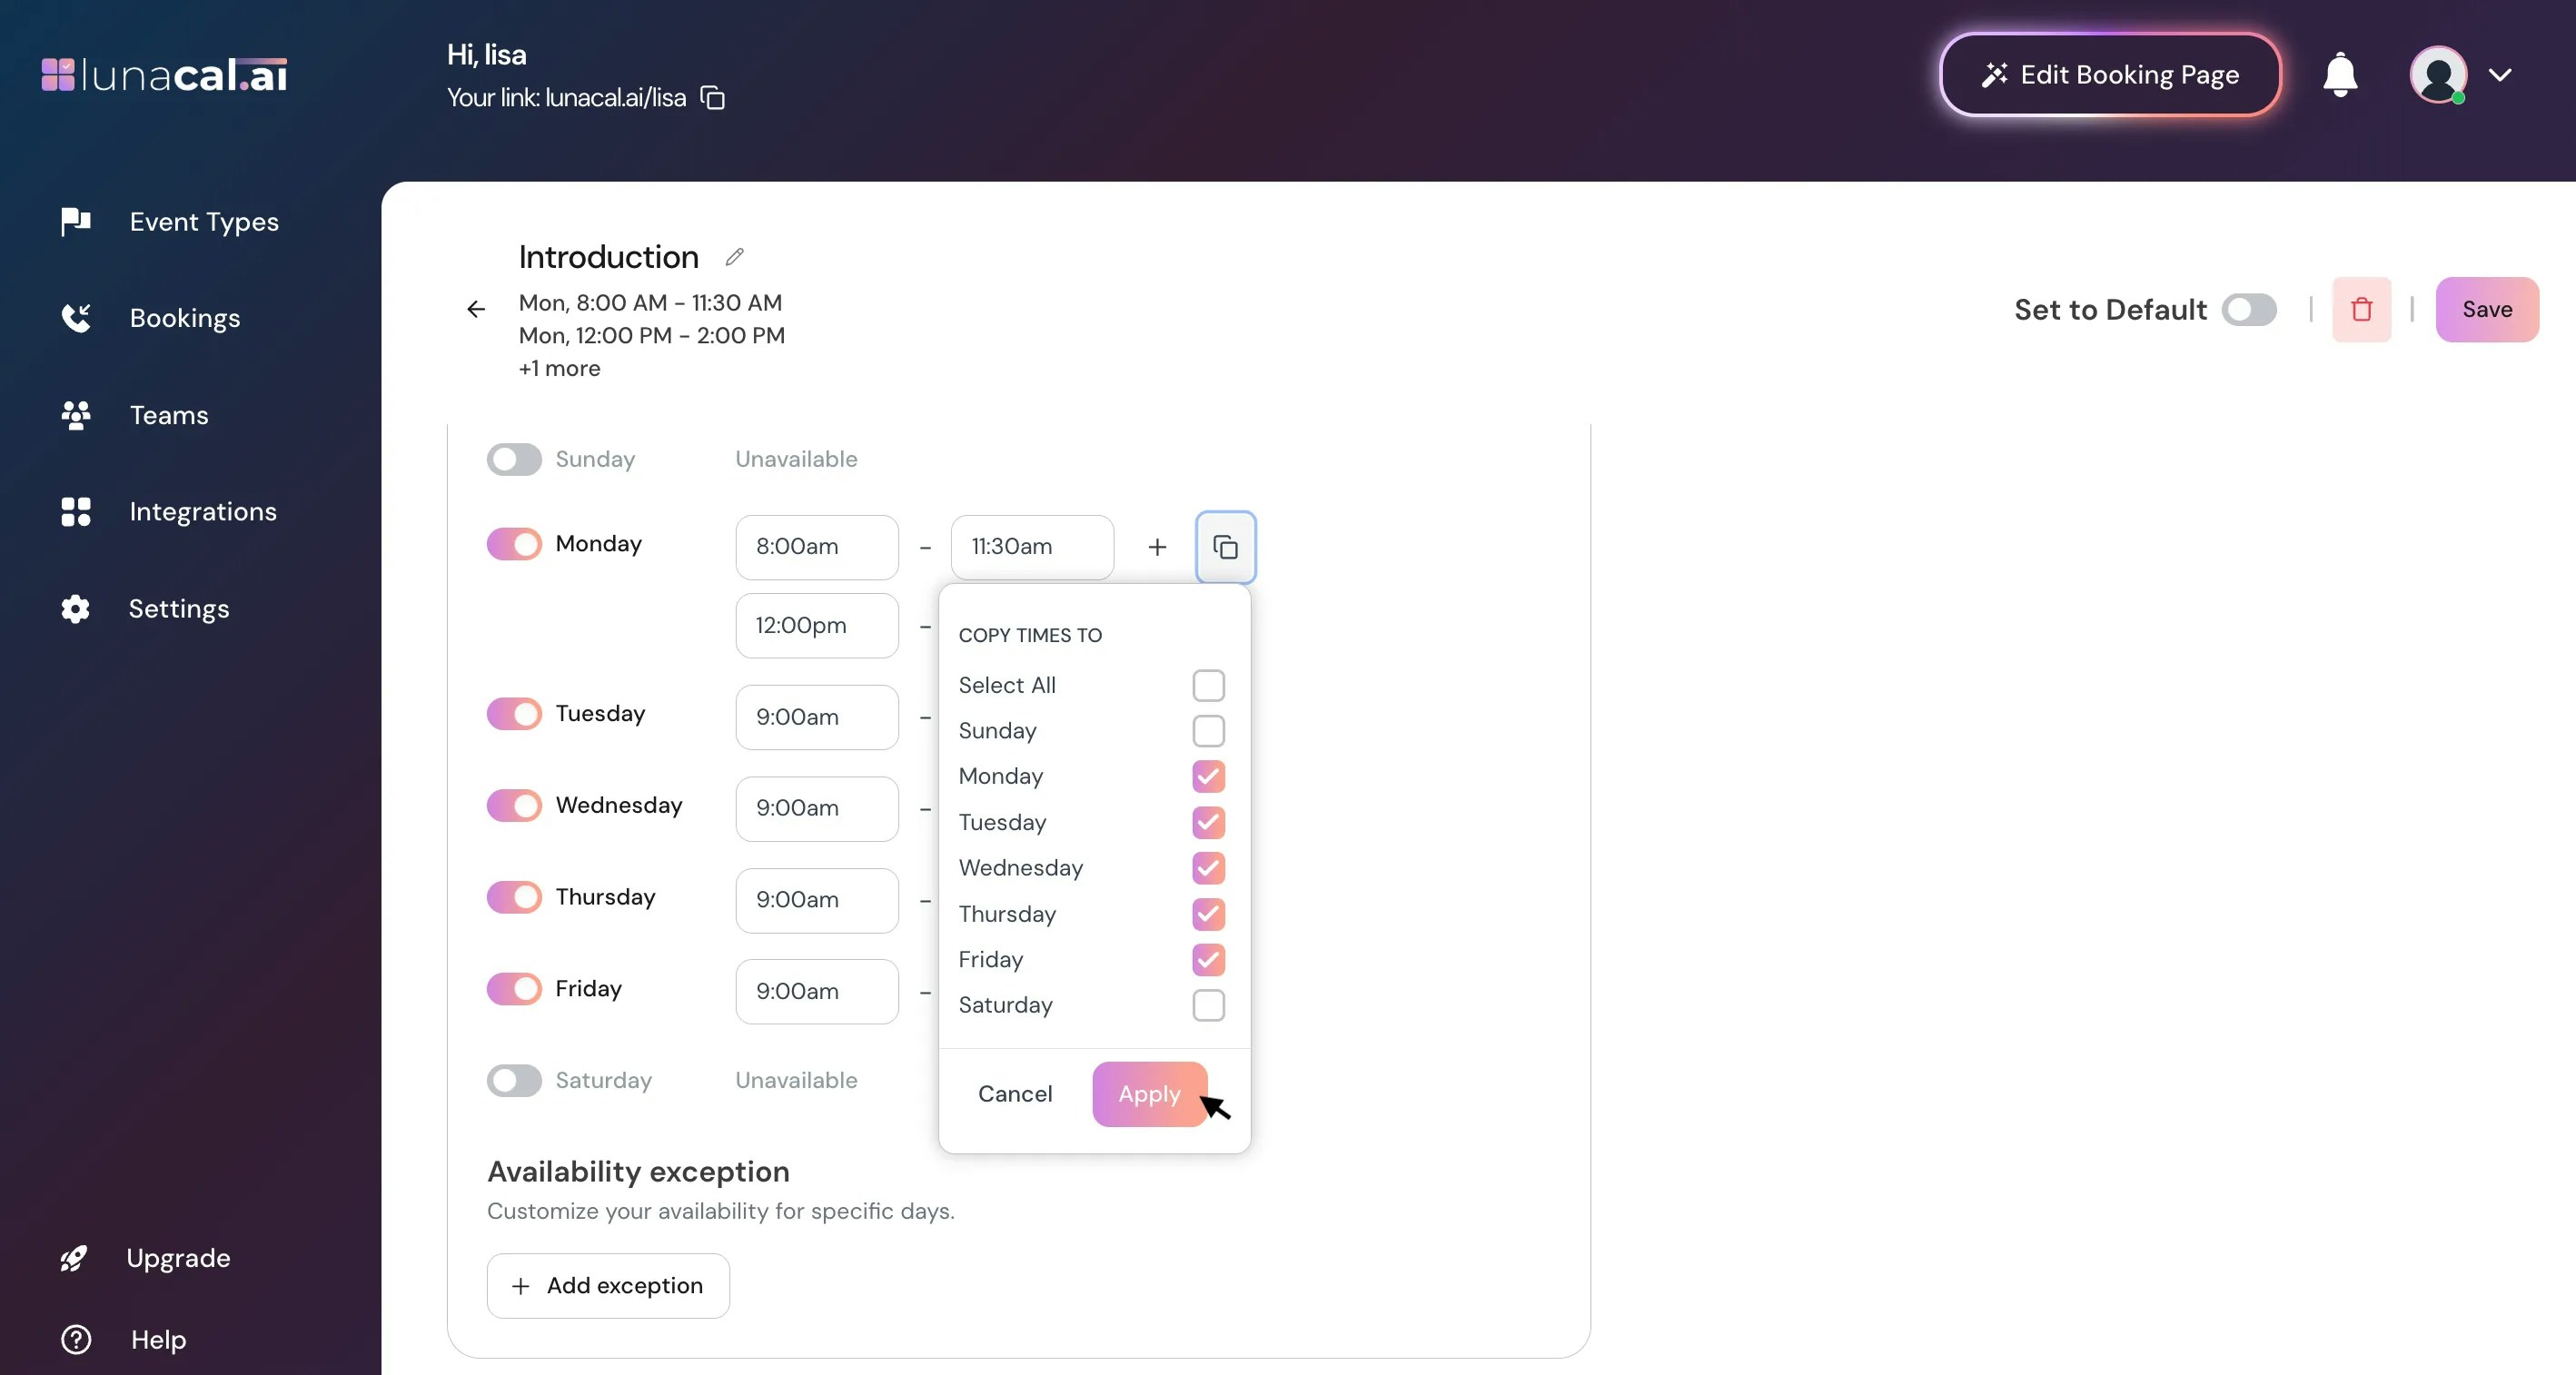
 ## Step 6
You can copy your working hours to other days if the schedule is the same.\
Click the **copy** icon, select the days you want to apply the same hours, and click **Apply**.
**Example:**\
If your Monday schedule is **9:00 AM–5:00 PM**, and you work the same hours Tuesday to Thursday, copy Monday’s timings to those days instead of adding them manually.
## Step 6
You can copy your working hours to other days if the schedule is the same.\
Click the **copy** icon, select the days you want to apply the same hours, and click **Apply**.
**Example:**\
If your Monday schedule is **9:00 AM–5:00 PM**, and you work the same hours Tuesday to Thursday, copy Monday’s timings to those days instead of adding them manually.
 ## Step 7
Availability Exception : This lets you block specific dates or times when you’re unavailable, even if those fall within your regular working hours. It’s useful for holidays, breaks, or one-off days off.
To add an exception, click **Add Exception**.
## Step 7
Availability Exception : This lets you block specific dates or times when you’re unavailable, even if those fall within your regular working hours. It’s useful for holidays, breaks, or one-off days off.
To add an exception, click **Add Exception**.
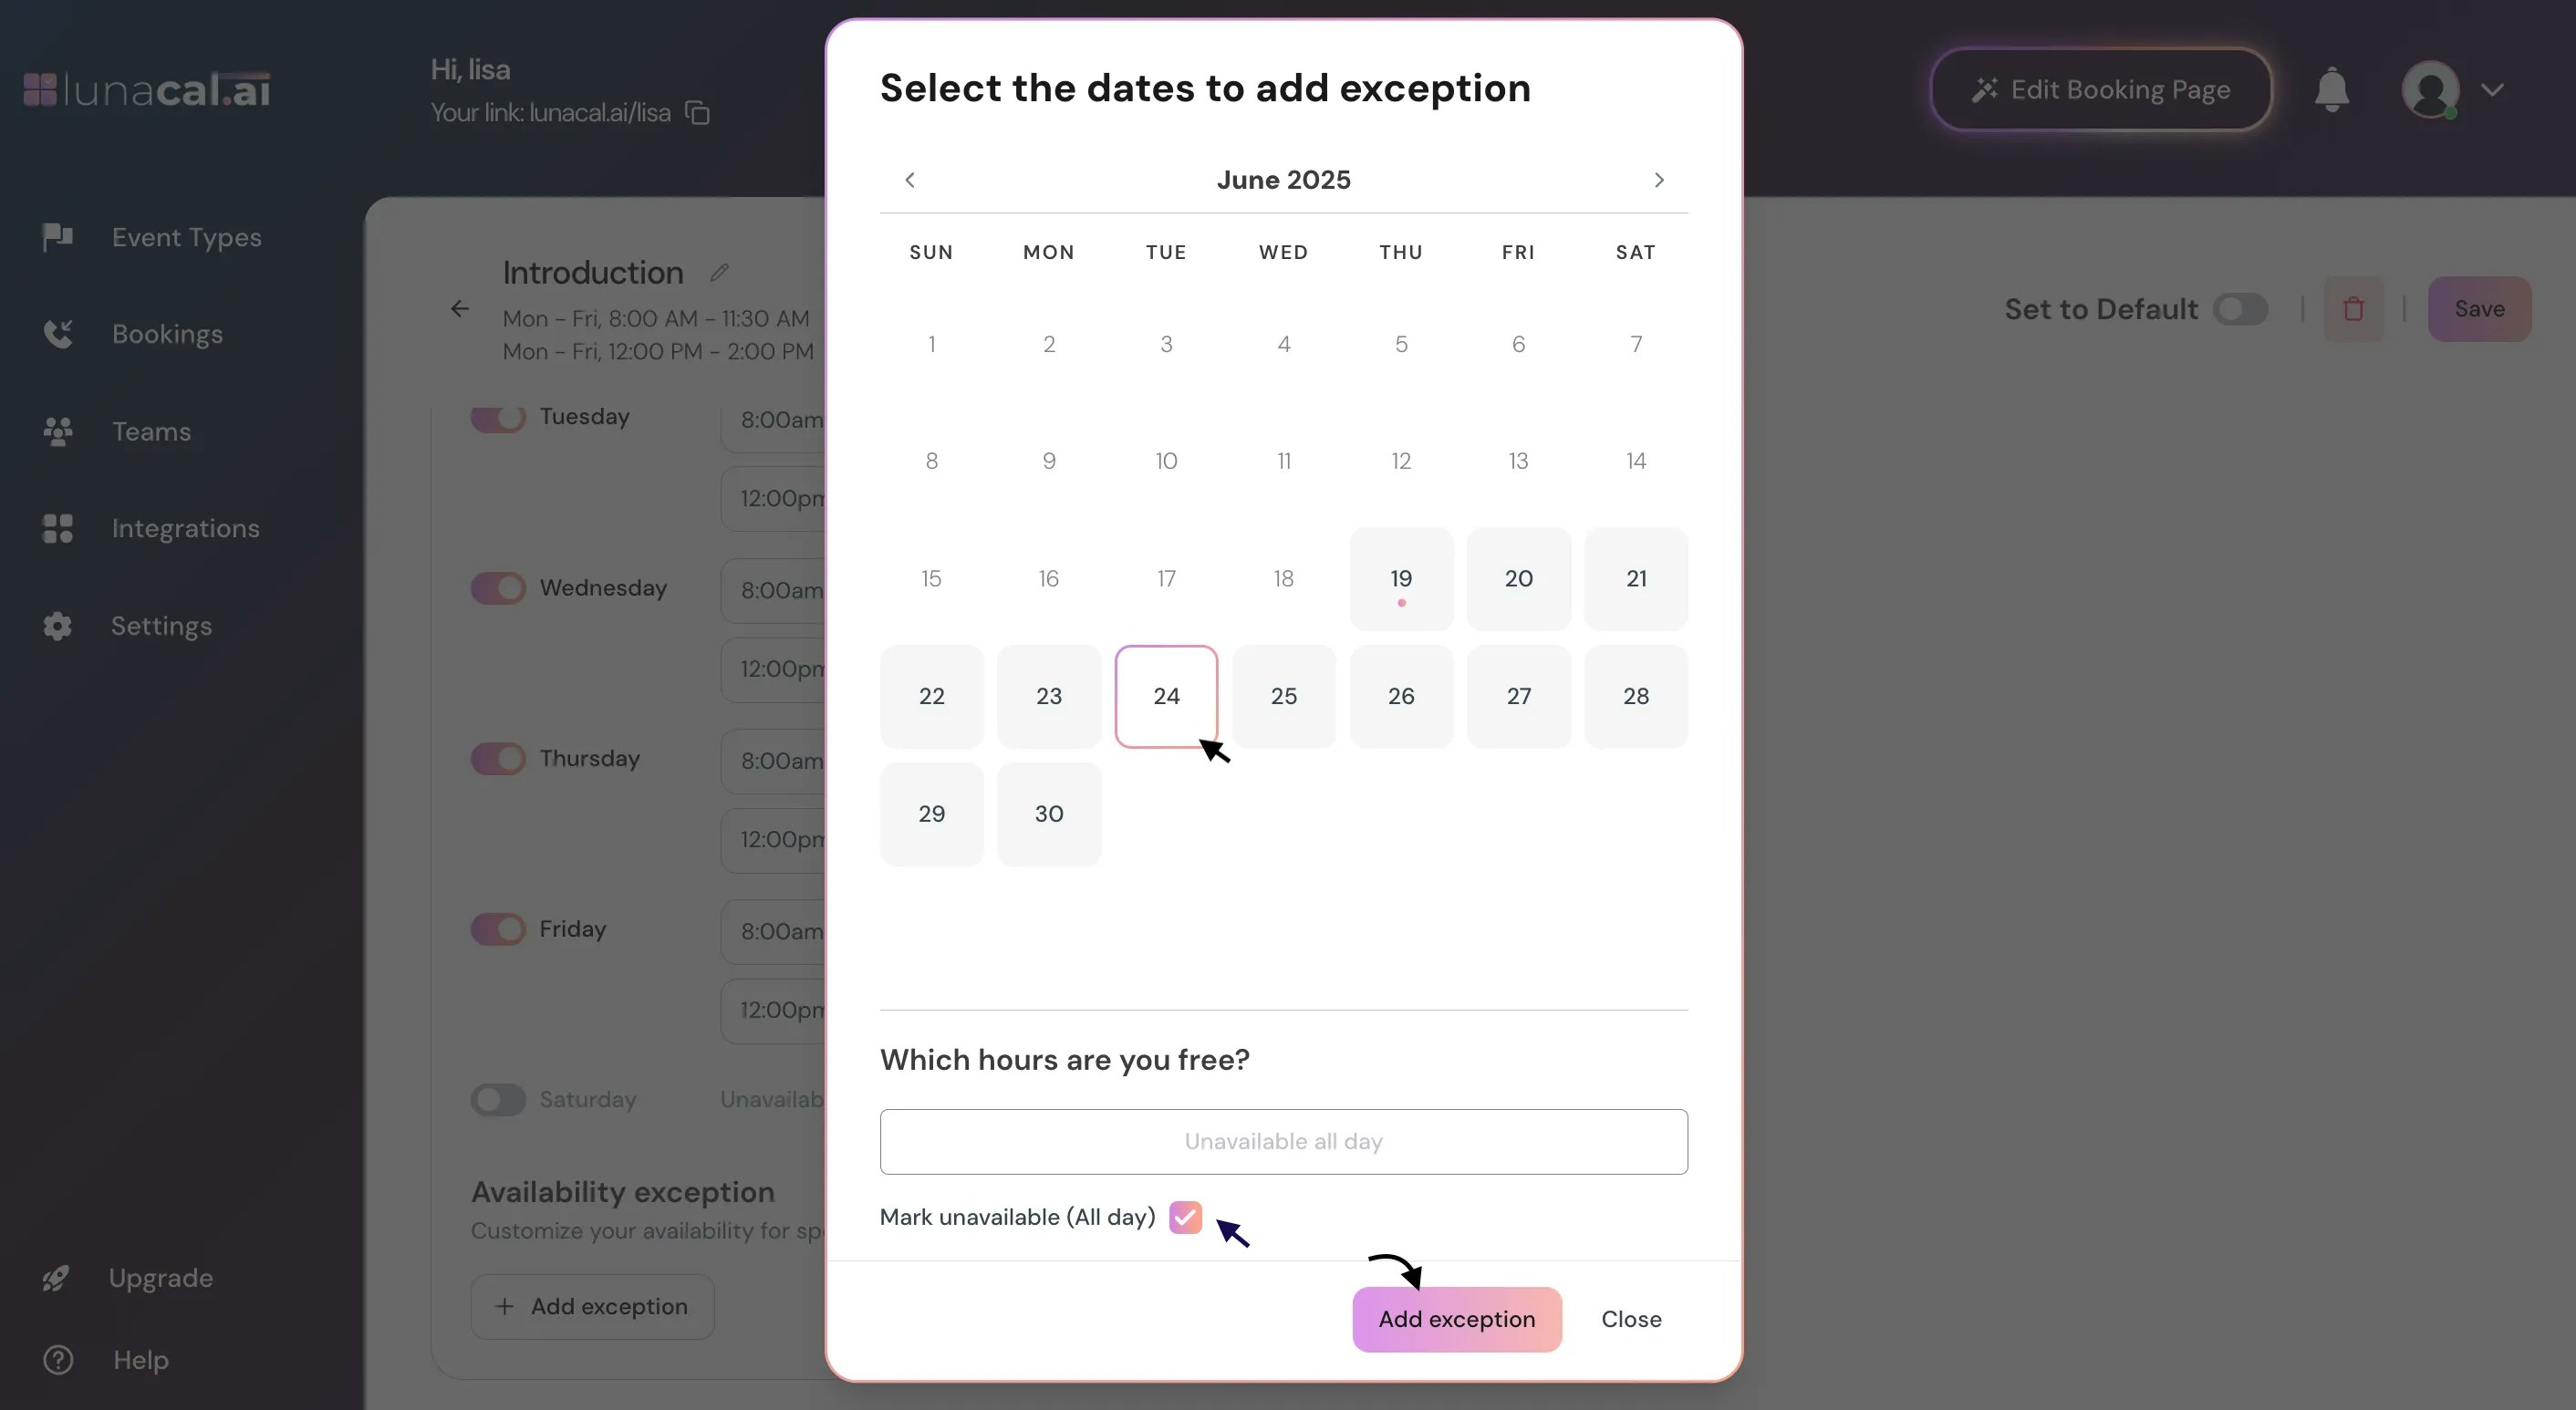
 ## Step 8
A calendar view will appear where you can select specific dates and set the times you’re unavailable for that day.\
**Example**: If you’re unavailable the entire day, check the **Mark Unavailable (All Day)** option.
## Step 8
A calendar view will appear where you can select specific dates and set the times you’re unavailable for that day.\
**Example**: If you’re unavailable the entire day, check the **Mark Unavailable (All Day)** option.
 ## Step 10
Click “**Save**” to store your changes.
## Step 10
Click “**Save**” to store your changes.
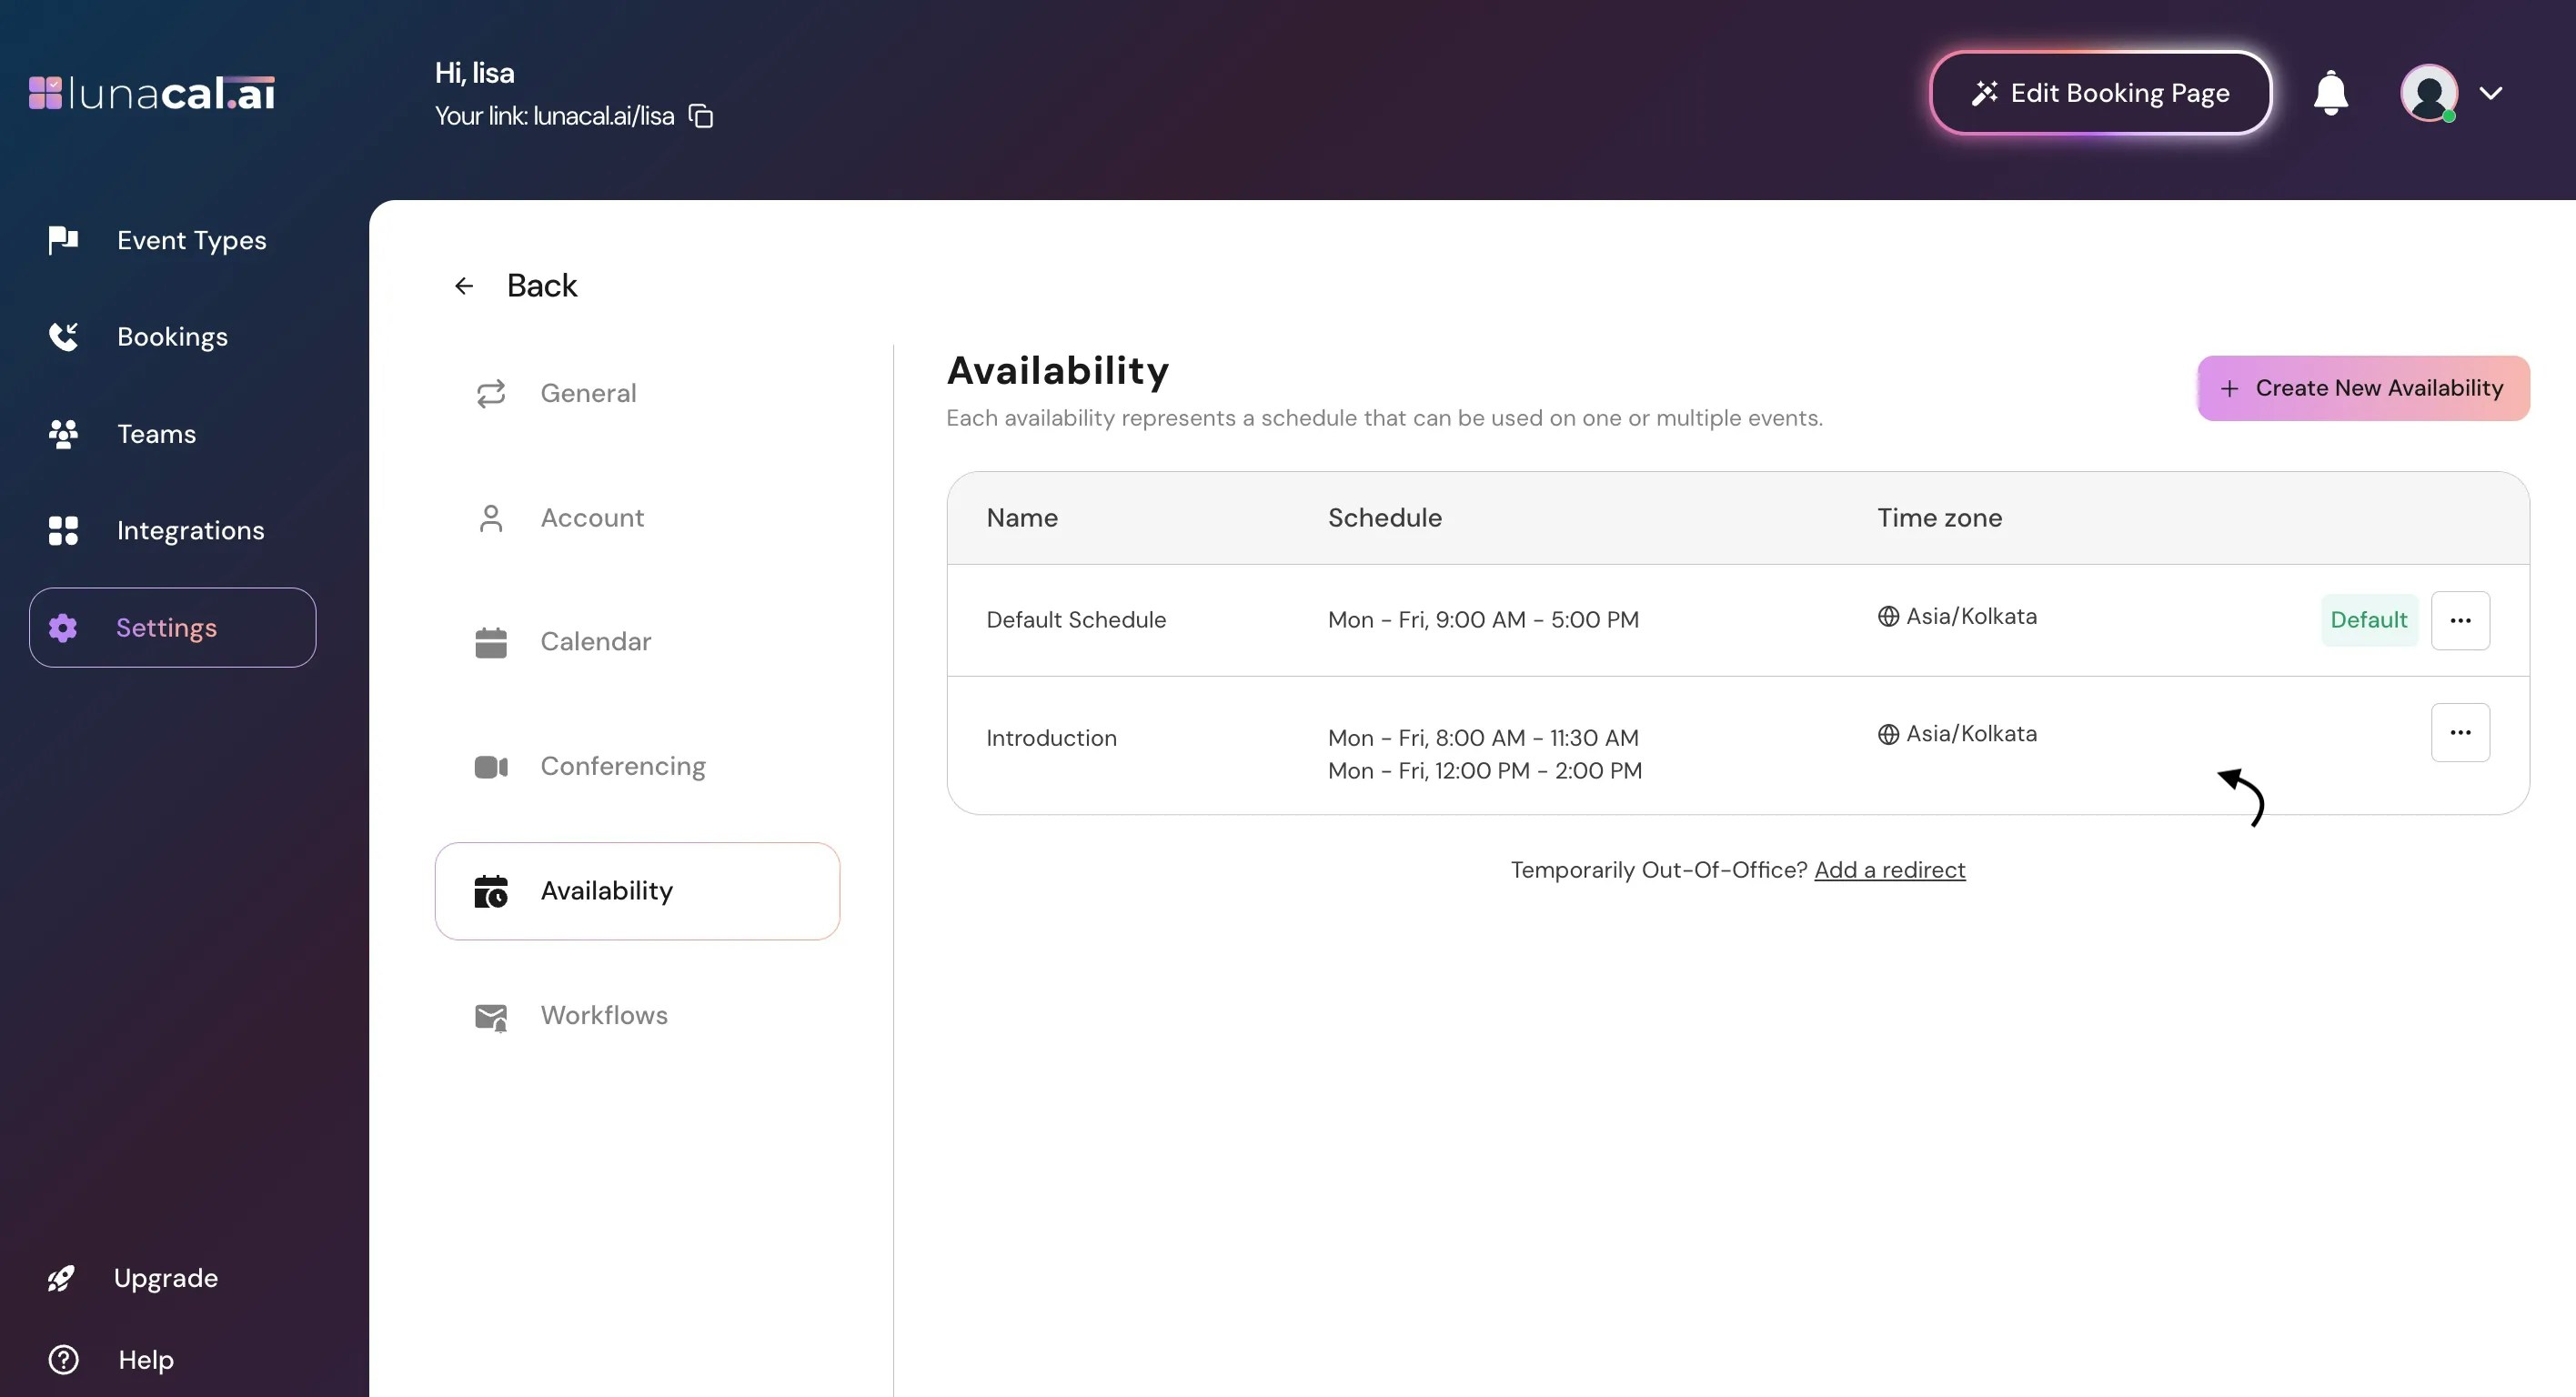
 ## Step 11
Your availability configuration is now completed.\
\
On the **Availability Dashboard**, you’ll see all the availabilities you’ve set up.\
Click the **three dots (⋮)** next to any availability to:
1. **Set as Default** – Make it your default availability.
2. **Duplicate** – Create a copy from an existing availability.
3. **Delete** – Remove an availability you no longer need.
## Step 11
Your availability configuration is now completed.\
\
On the **Availability Dashboard**, you’ll see all the availabilities you’ve set up.\
Click the **three dots (⋮)** next to any availability to:
1. **Set as Default** – Make it your default availability.
2. **Duplicate** – Create a copy from an existing availability.
3. **Delete** – Remove an availability you no longer need.
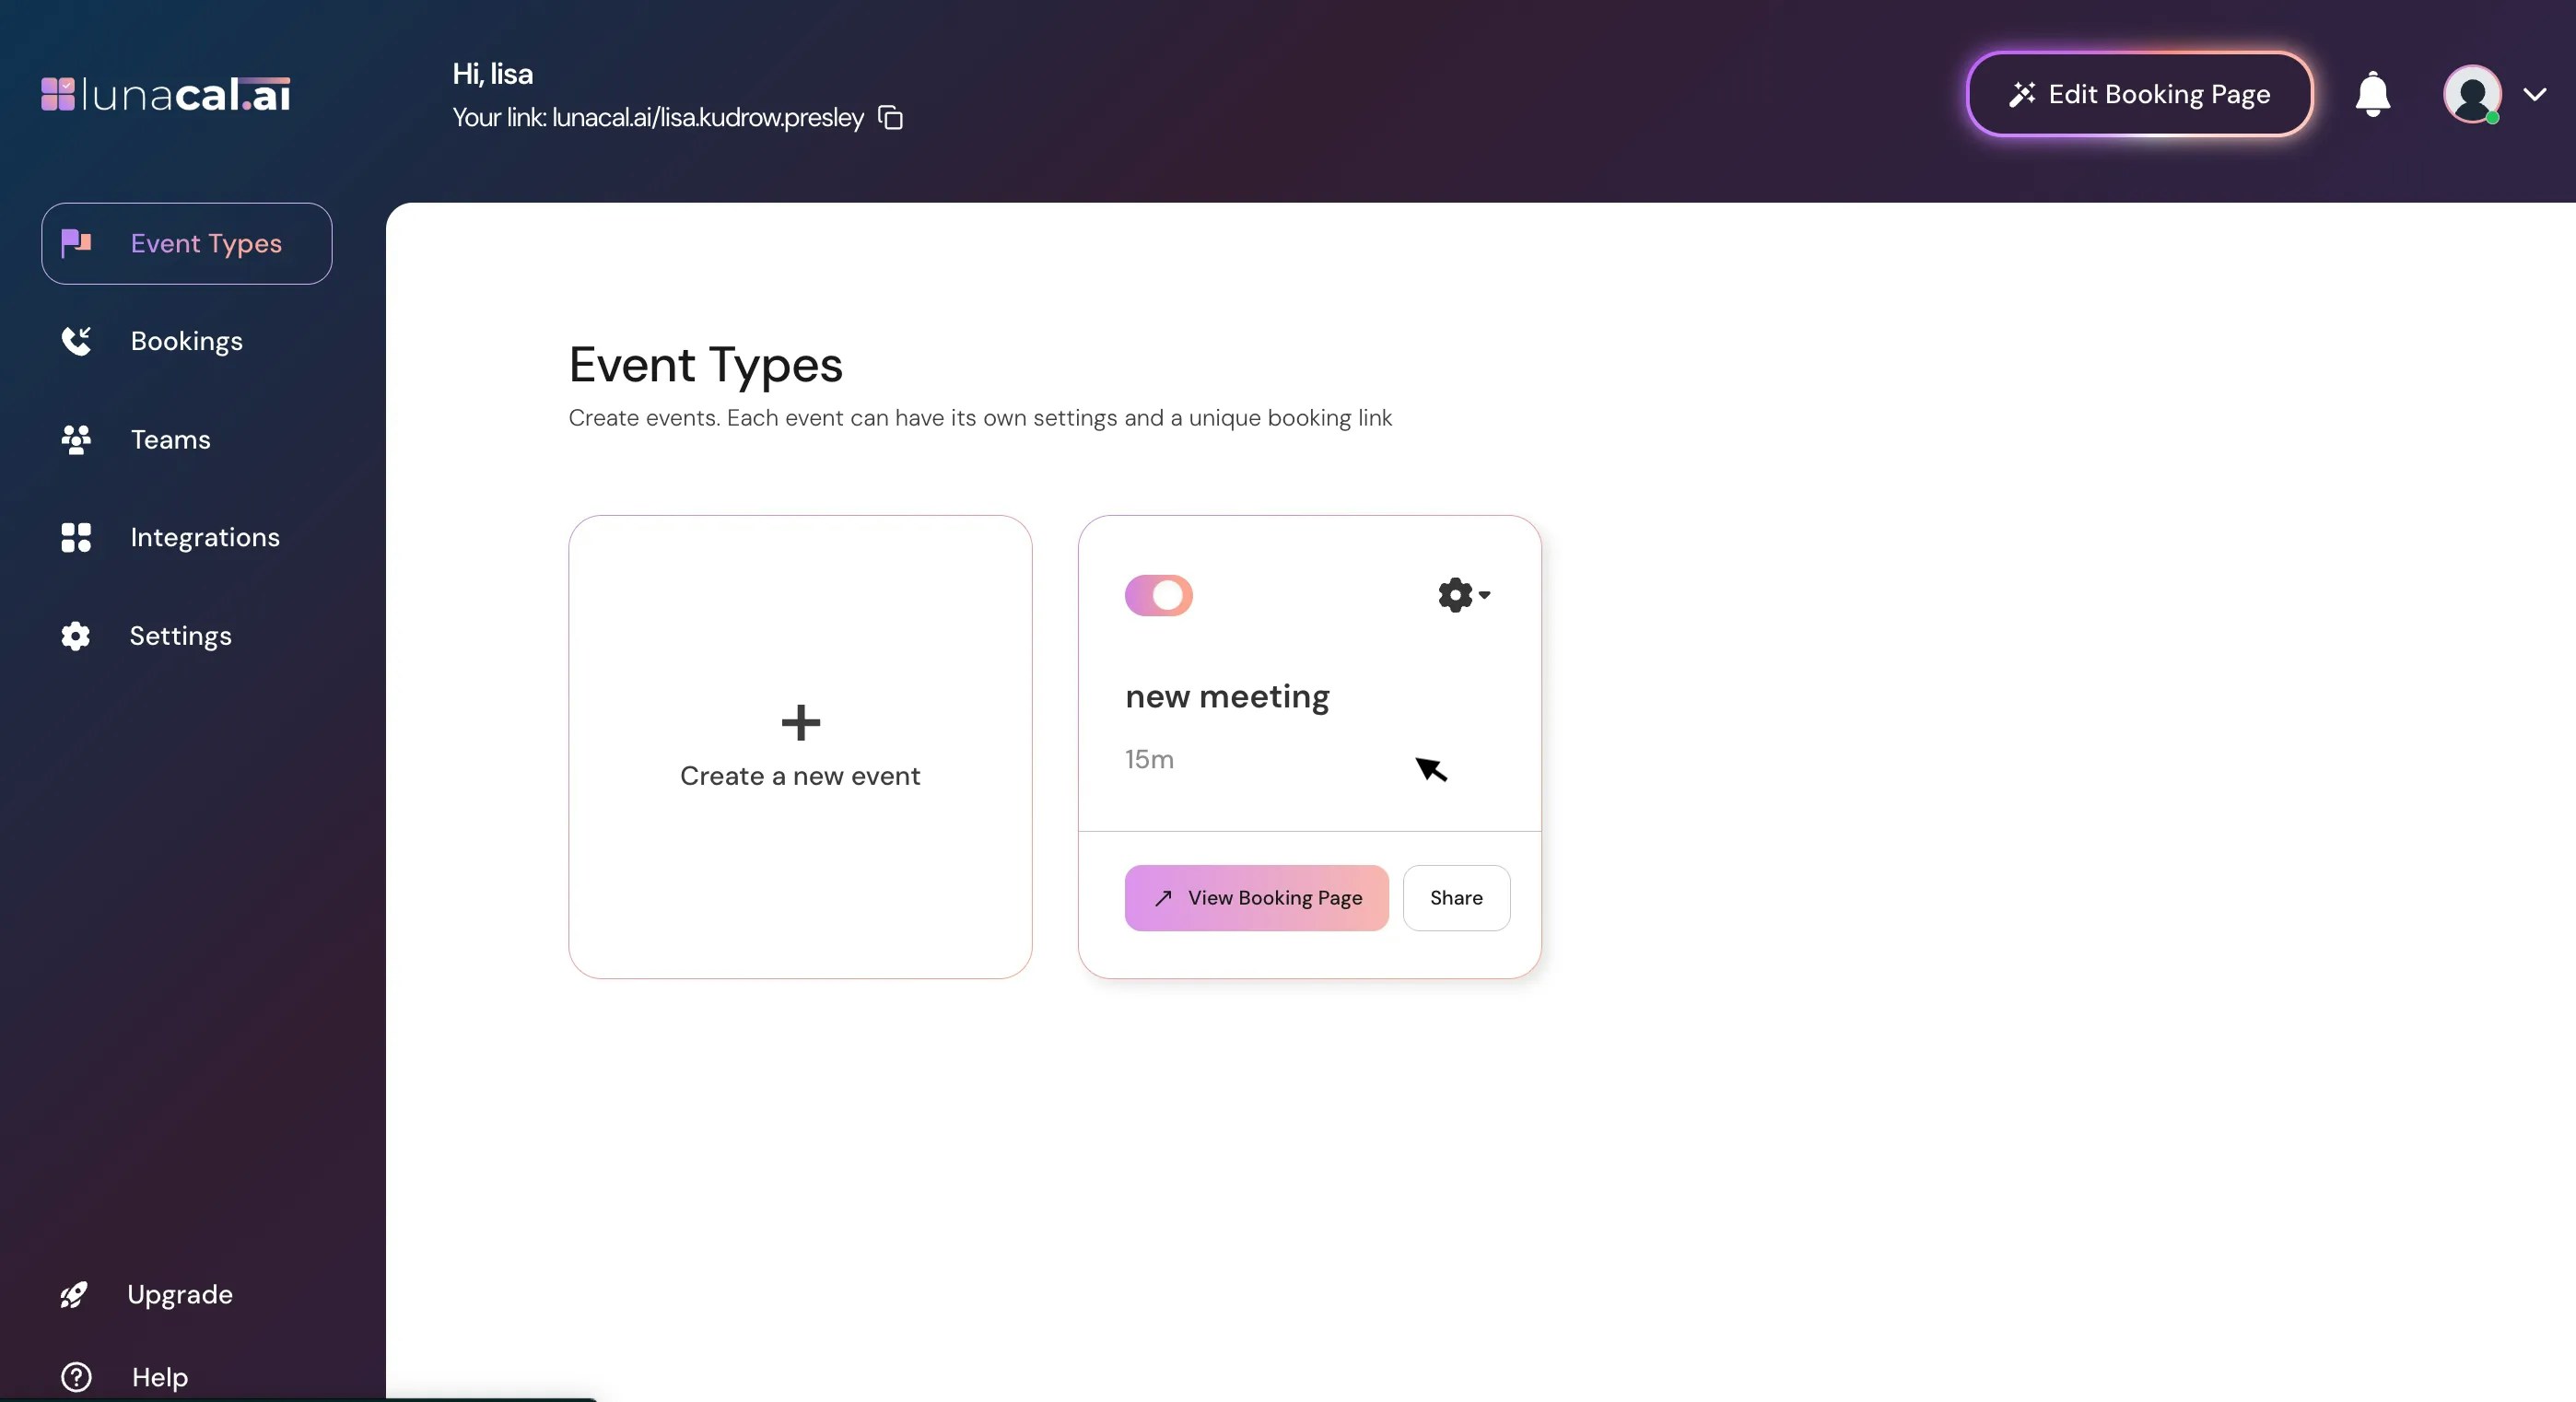
 ## Step 12
You can also update availability settings directly from your **Event Types**.\
Go to the **Event Types** section, select the event you want, and adjust its availability as needed.
## Step 12
You can also update availability settings directly from your **Event Types**.\
Go to the **Event Types** section, select the event you want, and adjust its availability as needed.
 ## Step 13
Use the dropdown to select one of your saved availabilities — for example, **“Introduction.”**\
The selected availability will apply to the specific event type you’re configuring, so that event will follow the same working hours and rules.
## Step 13
Use the dropdown to select one of your saved availabilities — for example, **“Introduction.”**\
The selected availability will apply to the specific event type you’re configuring, so that event will follow the same working hours and rules.
 ## Step 14
Review your settings and click "**Save**."
## Step 14
Review your settings and click "**Save**."
 **Common mistakes to avoid :**\
• Forgetting to click “Apply” before “Save”, which can discard your latest hour edits.\
• Leaving a day toggled on with empty hours, which can hide availability or cause confusion.\
• Forgetting to set an availability exception for holidays or one-off days off. If you skip this, attendees may still be able to book meetings on days you’re actually unavailable.\
• Using “Mark Unavailable” on the wrong date when adding an exception.\
• Not selecting your new availability in the event type dropdown, so the event still uses an old schedule.
**Good defaults to start with :**\
• Hours: **10:00 AM–6:00 PM**, Mon–Fri; turn Sat–Sun off.\
• Split day: add a 30-minute mid-day break to avoid back-to-backs.\
• Exceptions: add known holidays and travel days for the next 60–90 days now.\
• Event types: map “**Introduction**” to short meetings; use a separate availability for longer sessions.
**Common mistakes to avoid :**\
• Forgetting to click “Apply” before “Save”, which can discard your latest hour edits.\
• Leaving a day toggled on with empty hours, which can hide availability or cause confusion.\
• Forgetting to set an availability exception for holidays or one-off days off. If you skip this, attendees may still be able to book meetings on days you’re actually unavailable.\
• Using “Mark Unavailable” on the wrong date when adding an exception.\
• Not selecting your new availability in the event type dropdown, so the event still uses an old schedule.
**Good defaults to start with :**\
• Hours: **10:00 AM–6:00 PM**, Mon–Fri; turn Sat–Sun off.\
• Split day: add a 30-minute mid-day break to avoid back-to-backs.\
• Exceptions: add known holidays and travel days for the next 60–90 days now.\
• Event types: map “**Introduction**” to short meetings; use a separate availability for longer sessions.