> ## Documentation Index
> Fetch the complete documentation index at: https://help.lunacal.ai/llms.txt
> Use this file to discover all available pages before exploring further.
# Zapier Integration with Lunacal
> Learn how to automatically send data from Lunacal.ai to Zapier.
## Overview
With Lunacal.ai’s Zapier integration, you can automate workflows that respond to booking events. This guide walks you through setting up a Zap that captures data from your booking and sends it directly to zapier — helping you keep track of marketing sources effortlessly.
## ✅ Prerequisites
Before you start:
* A [Zapier](https://zapier.com) account
* A [Lunacal.ai](https://lunacal.ai) account
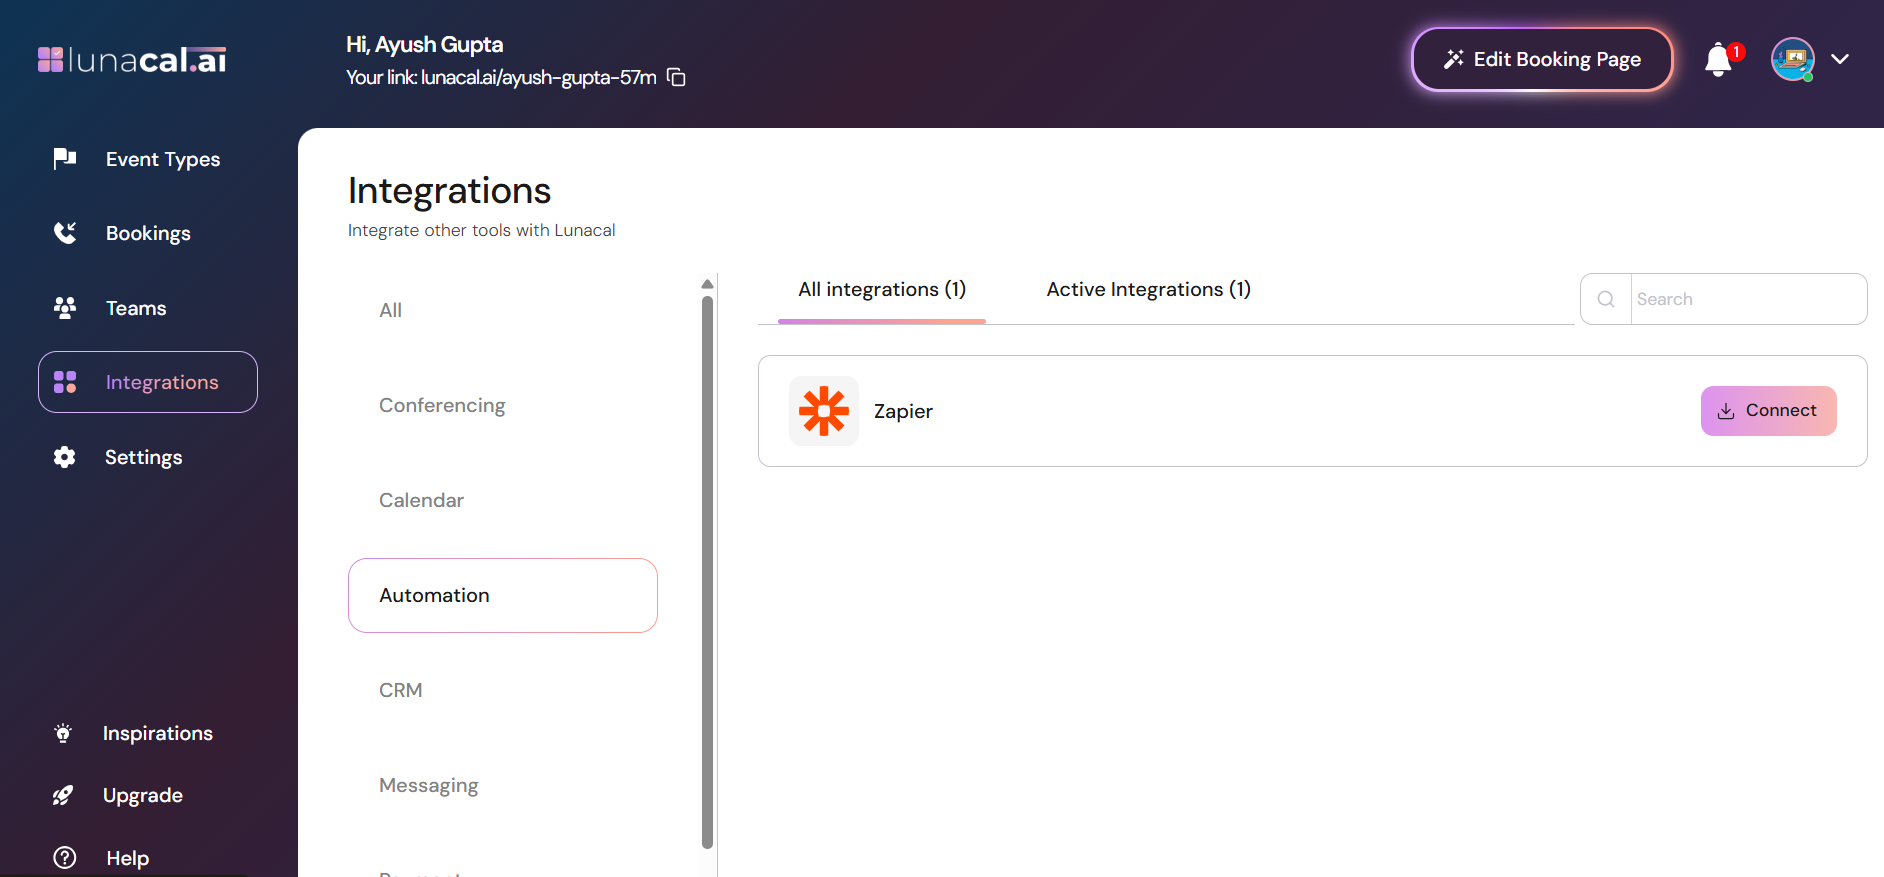
## 🔌 Step 1: Connect Zapier in Lunacal.ai
1. Log in to your Lunacal dashboard.
2. In the left sidebar, click on **Integrations**.
3. Select **Automation** from the integration categories.
4. Click the **Connect** button on the **Zapier** card to initiate the connection.
***
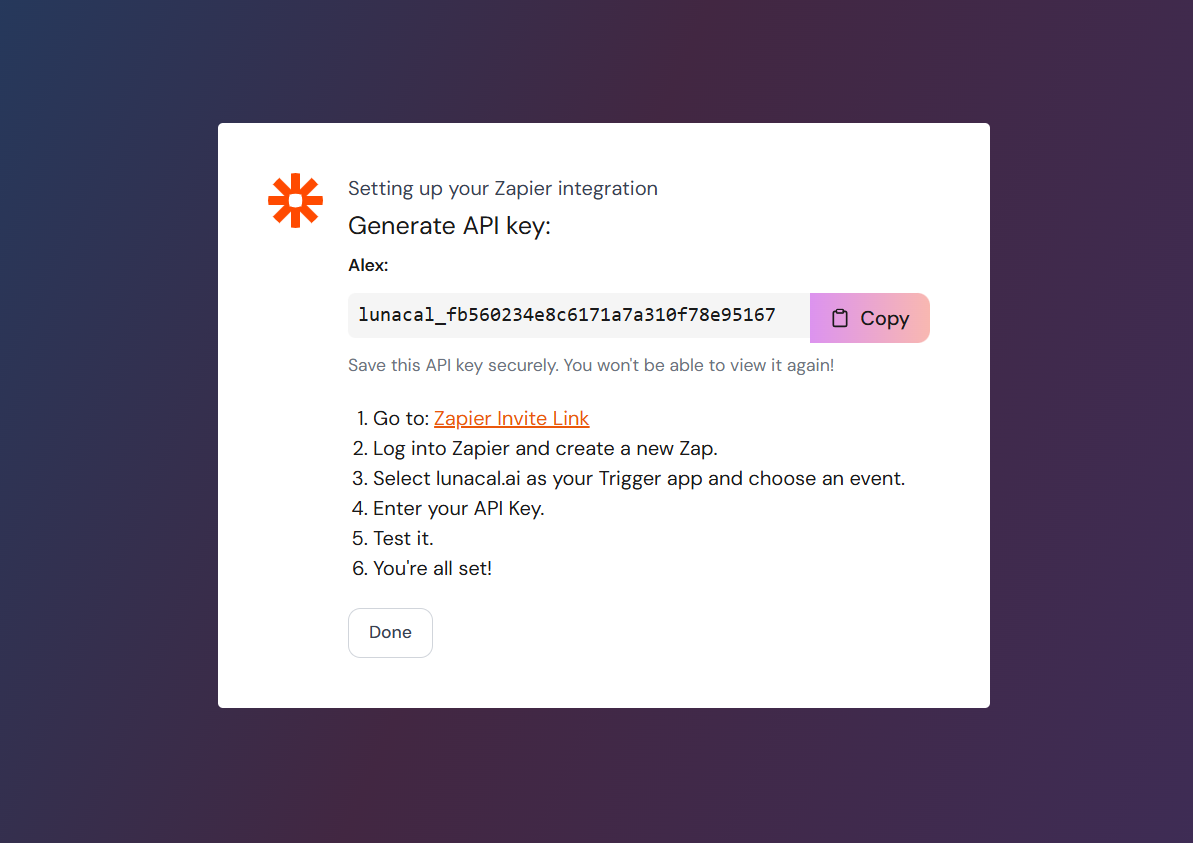
## 🔑 Step 2: Generate and Save Your API Key
After clicking **Connect**:
1. Lunacal.ai will generate a unique **API Key**.
2. Copy the API key — **you won’t be able to view it again**.
3. Paste and save it in a secure place (we will be needing it in next step).
4. Click **Done** to complete the setup on Lunacal.
## 🧠 Step 3: Link Lunacal.ai to Zapier
1. Open [Zapier](https://zapier.com) and go to **My Apps**.
2. Click **+ Add Connection**.
3. Search for **Lunacal.ai** and click on it.
4. When prompted, paste the **API key** you saved earlier.
5. Zapier will verify and establish the connection to Lunacal.
***
## ⚙️ Step 4: Build Your Zap Workflow
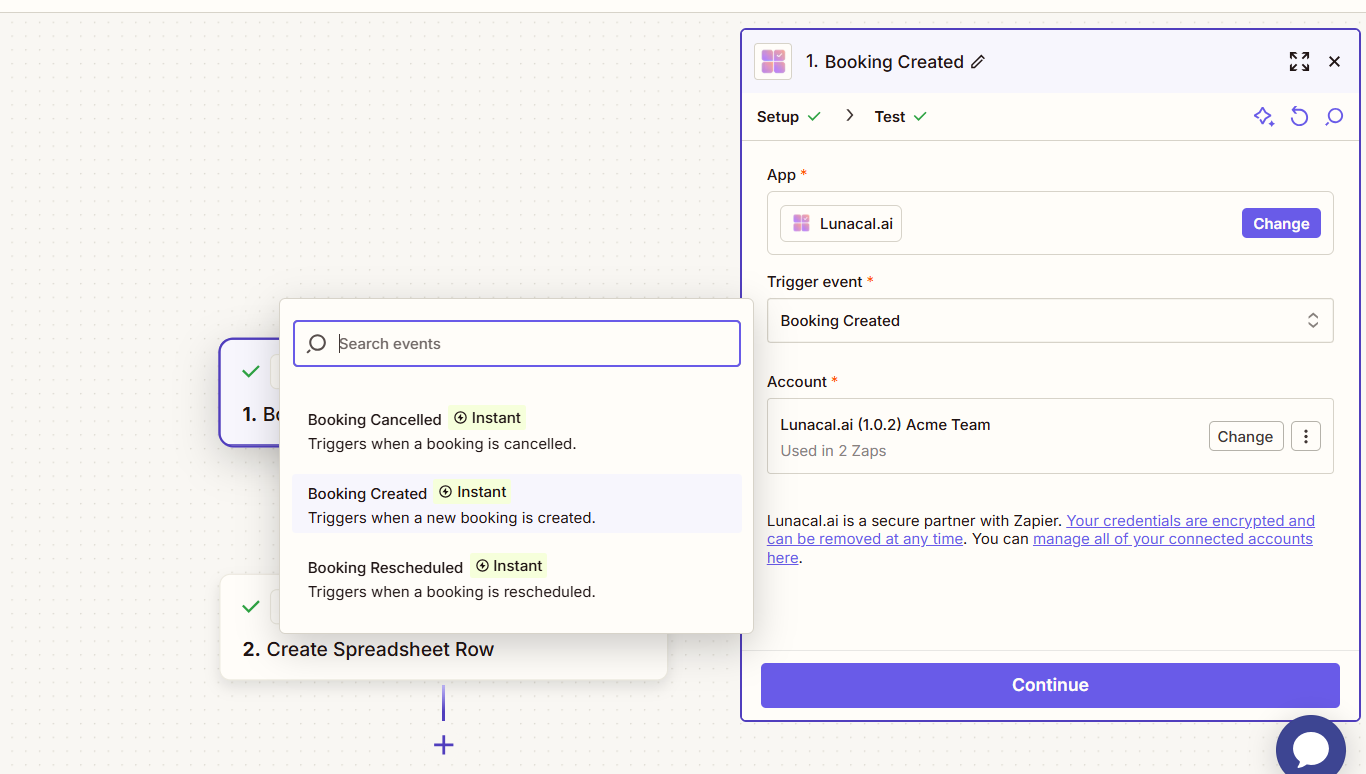
### 4.1 Set up the Trigger
1. Click **+ Create Zap** in Zapier.
2. In the **Trigger** step, search and select `Lunacal.ai`.
3. Currently, there are three event triggers available:
* **Booking Cancelled** **:** Triggered when a booking is cancelled
* **Booking Created** **:** Triggered when a new booking is created by any user.
* **Booking Rescheduled :** Triggered when an existing booking is rescheduled for future.
4. Under **Event**, choose `Booking Created`.
5. Choose the Lunacal account you just connected.
6. Click **Test Trigger** to ensure data is received correctly.
* This helps Zapier fetch a sample payload for configuration.
* Make sure you have at least one booking in Lunacal to test with
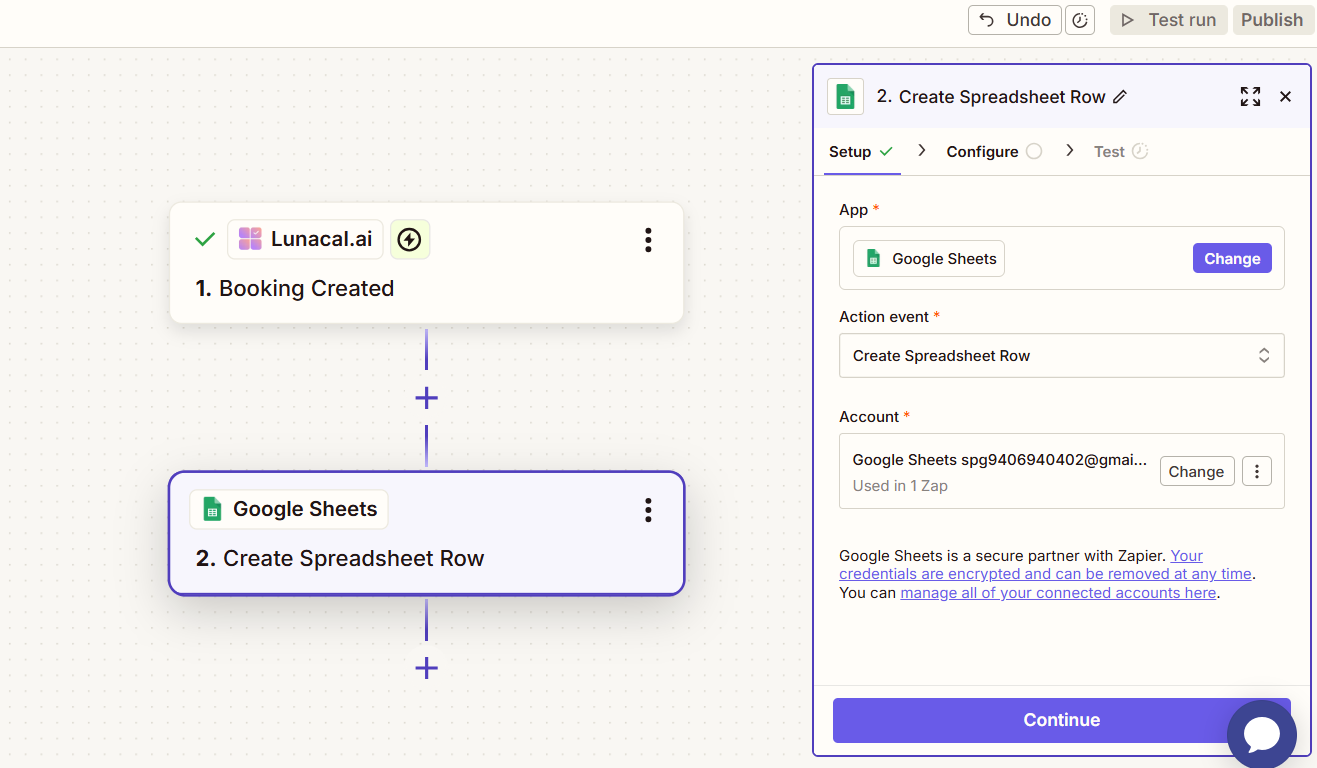
### 4.2 Set up the Action with Google Sheets \[ or any app of your choice ]
Now we’ll write this booking data to a Google Sheet.
1. In the **Action** step, search for and select `Google Sheets`.
2. Choose the action event: **Create Spreadsheet Row**.
3. Connect your Google account if you haven’t already.
4. Select the spreadsheet and worksheet where the data should go.
5. Ensure the sheet has the following columns created beforehand:
* `Name`
* `Email`
> **Note:** You can add more fields like `createdAt`, `Event Name`, etc. These must exist in the sheet before proceeding.
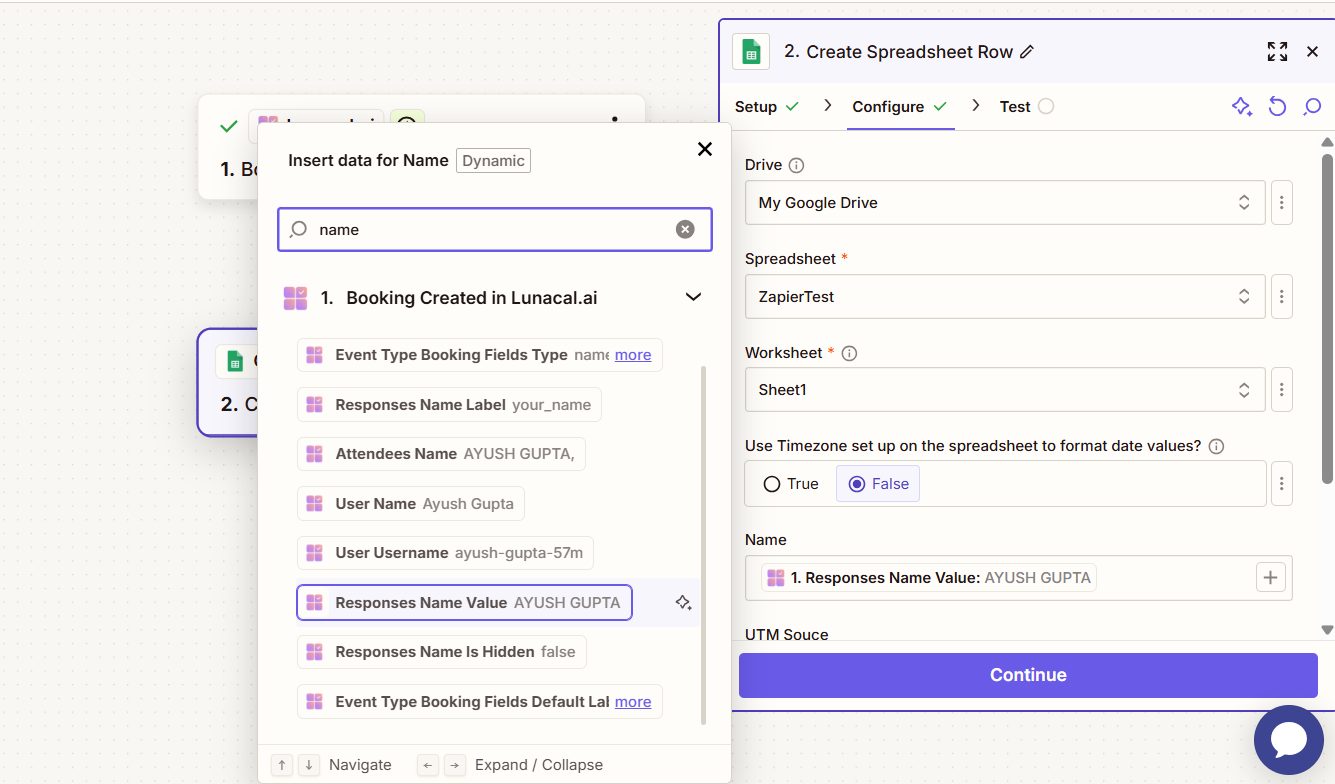
### 4.3 Configure Data Mapping
You’ll now map Lunacal.ai booking fields to the Google Sheet columns:
| Google Sheet Column | Lunacal.ai Field Example |
| ------------------- | -------------------------- |
| Name | `1. Responses Name Value` |
| Email | `1. Responses Email Value` |
## 🧪 Step 5: Test and Publish
1. Click **Test Action** in Zapier to send a test row to your sheet.
2. Confirm that the data appears in the correct cells.
3. Once validated, click **Publish** to activate your Zap.
4. You’re done — future bookings will now be pushed to Google Sheets automatically!
## ✅ Outro
You’ve now connected Lunacal.ai and Zapier to:
* Trigger workflows when bookings are created
* Push data to Google Sheets without manual work
 ***
## 🔑 Step 2: Generate and Save Your API Key
After clicking **Connect**:
1. Lunacal.ai will generate a unique **API Key**.
2. Copy the API key — **you won’t be able to view it again**.
3. Paste and save it in a secure place (we will be needing it in next step).
4. Click **Done** to complete the setup on Lunacal.
***
## 🔑 Step 2: Generate and Save Your API Key
After clicking **Connect**:
1. Lunacal.ai will generate a unique **API Key**.
2. Copy the API key — **you won’t be able to view it again**.
3. Paste and save it in a secure place (we will be needing it in next step).
4. Click **Done** to complete the setup on Lunacal.
 ## 🧠 Step 3: Link Lunacal.ai to Zapier
1. Open [Zapier](https://zapier.com) and go to **My Apps**.
2. Click **+ Add Connection**.
3. Search for **Lunacal.ai** and click on it.
4. When prompted, paste the **API key** you saved earlier.
5. Zapier will verify and establish the connection to Lunacal.
## 🧠 Step 3: Link Lunacal.ai to Zapier
1. Open [Zapier](https://zapier.com) and go to **My Apps**.
2. Click **+ Add Connection**.
3. Search for **Lunacal.ai** and click on it.
4. When prompted, paste the **API key** you saved earlier.
5. Zapier will verify and establish the connection to Lunacal.
 ***
## ⚙️ Step 4: Build Your Zap Workflow
### 4.1 Set up the Trigger
1. Click **+ Create Zap** in Zapier.
2. In the **Trigger** step, search and select `Lunacal.ai`.
3. Currently, there are three event triggers available:
* **Booking Cancelled** **:** Triggered when a booking is cancelled
* **Booking Created** **:** Triggered when a new booking is created by any user.
* **Booking Rescheduled :** Triggered when an existing booking is rescheduled for future.
4. Under **Event**, choose `Booking Created`.
5. Choose the Lunacal account you just connected.
6. Click **Test Trigger** to ensure data is received correctly.
* This helps Zapier fetch a sample payload for configuration.
* Make sure you have at least one booking in Lunacal to test with
***
## ⚙️ Step 4: Build Your Zap Workflow
### 4.1 Set up the Trigger
1. Click **+ Create Zap** in Zapier.
2. In the **Trigger** step, search and select `Lunacal.ai`.
3. Currently, there are three event triggers available:
* **Booking Cancelled** **:** Triggered when a booking is cancelled
* **Booking Created** **:** Triggered when a new booking is created by any user.
* **Booking Rescheduled :** Triggered when an existing booking is rescheduled for future.
4. Under **Event**, choose `Booking Created`.
5. Choose the Lunacal account you just connected.
6. Click **Test Trigger** to ensure data is received correctly.
* This helps Zapier fetch a sample payload for configuration.
* Make sure you have at least one booking in Lunacal to test with
 ### 4.2 Set up the Action with Google Sheets \[ or any app of your choice ]
Now we’ll write this booking data to a Google Sheet.
1. In the **Action** step, search for and select `Google Sheets`.
2. Choose the action event: **Create Spreadsheet Row**.
3. Connect your Google account if you haven’t already.
4. Select the spreadsheet and worksheet where the data should go.
5. Ensure the sheet has the following columns created beforehand:
* `Name`
* `Email`
> **Note:** You can add more fields like `createdAt`, `Event Name`, etc. These must exist in the sheet before proceeding.
### 4.2 Set up the Action with Google Sheets \[ or any app of your choice ]
Now we’ll write this booking data to a Google Sheet.
1. In the **Action** step, search for and select `Google Sheets`.
2. Choose the action event: **Create Spreadsheet Row**.
3. Connect your Google account if you haven’t already.
4. Select the spreadsheet and worksheet where the data should go.
5. Ensure the sheet has the following columns created beforehand:
* `Name`
* `Email`
> **Note:** You can add more fields like `createdAt`, `Event Name`, etc. These must exist in the sheet before proceeding.
 ### 4.3 Configure Data Mapping
You’ll now map Lunacal.ai booking fields to the Google Sheet columns:
| Google Sheet Column | Lunacal.ai Field Example |
| ------------------- | -------------------------- |
| Name | `1. Responses Name Value` |
| Email | `1. Responses Email Value` |
### 4.3 Configure Data Mapping
You’ll now map Lunacal.ai booking fields to the Google Sheet columns:
| Google Sheet Column | Lunacal.ai Field Example |
| ------------------- | -------------------------- |
| Name | `1. Responses Name Value` |
| Email | `1. Responses Email Value` |
 ## 🧪 Step 5: Test and Publish
1. Click **Test Action** in Zapier to send a test row to your sheet.
2. Confirm that the data appears in the correct cells.
3. Once validated, click **Publish** to activate your Zap.
4. You’re done — future bookings will now be pushed to Google Sheets automatically!
## ✅ Outro
You’ve now connected Lunacal.ai and Zapier to:
* Trigger workflows when bookings are created
* Push data to Google Sheets without manual work
## 🧪 Step 5: Test and Publish
1. Click **Test Action** in Zapier to send a test row to your sheet.
2. Confirm that the data appears in the correct cells.
3. Once validated, click **Publish** to activate your Zap.
4. You’re done — future bookings will now be pushed to Google Sheets automatically!
## ✅ Outro
You’ve now connected Lunacal.ai and Zapier to:
* Trigger workflows when bookings are created
* Push data to Google Sheets without manual work